
PS1 BIOS Download & Setup Guide for ePSXe, DuckStation, and RetroArch
Last Updated: June 2026
The PS1 BIOS is the small startup file that every PlayStation 1 emulator needs to run your games. Without it, most emulators show a black screen, crash, or refuse to load a disc. So if you want to play PlayStation 1 classics on a PC or phone, this file is the first thing to set up. I have set up the PS1 BIOS on DuckStation, ePSXe, and RetroArch many times, and on a real PSone too. So in this guide, you will learn what the PS1 BIOS is, how to download it safely, and how to install it in each emulator step by step.
Quick answer: The most common PS1 BIOS file is SCPH1001.bin. It is the USA (NTSC-U) version, it is about 512 KB, and it works with nearly all PlayStation 1 emulators.
File Name | PS1 BIOS Full Pack |
File Size | 0.92 MB |
Supporting OS | Android, Windows & iOS |
Downloads | 500k+ |
Supporting Emulators | ePSXe, DuckStation, RetroArch (Beetle PSX core), PCSX-Reloaded, and most PS1 emulators |
Last Update | 24 June, 2026 |
What Is the PS1 BIOS?
The PS1 BIOS is the system software that came built into every PlayStation 1 console. BIOS stands for Basic Input/Output System. In simple words, it acts like the console’s operating system. It starts the hardware, reads game discs, and manages memory cards before any game loads.
When you turn on a real PlayStation 1, the BIOS runs first. It checks the system, shows the classic Sony logo, and then hands control to the game. An emulator copies this behaviour with a PS1 BIOS file, so your games feel like they do on real hardware.
People also call this firmware the PSX BIOS or the PlayStation 1 BIOS. All of these names point to the same kind of file, such as SCPH1001.bin.
Core Functions of the PS1 BIOS
The PS1 BIOS handles a few key jobs inside the console and the emulator. For example, it:
Because of these jobs, the BIOS is the backbone of any emulation setup. Without it, the emulator must guess how the real console worked. As a result, some games glitch or fail to start.
PS1 BIOS File Details
Most people who search for a PS1 BIOS file are looking for one specific file. Here are the basics of the standard ps1 bios scph1001 file:
The file name matters more than people expect. Many emulators look for the exact name scph1001.bin. So if you rename the file, auto-detection can fail even when the file is fine. Therefore, keep the original name unless your emulator asks for a different one.
Why Is a PS1 BIOS Needed for Emulation?
A ps1 emulator bios is needed because it lets the emulator act like a real PlayStation 1. The file handles core tasks like booting, disc reading, and saving. Without it, emulators like ePSXe, DuckStation, or RetroArch may crash or show errors.
Some emulators use High-Level Emulation (HLE) to skip the BIOS. However, HLE can miss small details from the real console. As a result, certain games freeze or lose features. So a real BIOS file gives the safest and most accurate results.
Key Features of PS1 BIOS for Emulation
A correct PS1 BIOS adds features that make games run better. For example, it:
PS1 BIOS Versions and Regions (USA, PAL, NTSC-J)
Sony made many BIOS versions for different console models and regions. Each file is tied to a region, so you should match the BIOS to your game. Below are the main types.
| BIOS file | Model | Region | Best for |
|---|---|---|---|
| SCPH1001.bin | SCPH-1001 | USA (NTSC-U/C) | Most US games; best all-round choice |
| SCPH5501.bin | SCPH-5501 | USA (NTSC-U/C) | Later US revision; great in DuckStation |
| SCPH7001.bin | SCPH-7001 | USA (NTSC-U/C) | Reliable late US model |
| SCPH5500.bin | SCPH-5500 | Japan (NTSC-J) | Japanese import titles |
| SCPH1000.bin | SCPH-1000 | Japan (NTSC-J) | Original Japanese games |
| SCPH7502.bin | SCPH-7502 | Europe (PAL) | European PAL games |
| SCPH5502.bin | SCPH-5502 | Europe (PAL) | Other PAL releases |
| SCPH101.bin | SCPH-101 | USA (PSone) | Slim PSone console |
SCPH1001.bin (USA / NTSC-U)
SCPH1001.bin is the USA BIOS. It supports NTSC-U/C games from the US and Canada. Also, it is the most widely used file, so it is the best starting point for most players.
SCPH5500.bin (Japan / NTSC-J)
SCPH5500.bin is the Japanese BIOS. Use it for Japan-only titles like classic JRPGs. As a result, region-specific games boot correctly.
SCPH7502.bin and SCPH5502.bin (Europe / PAL)
These are PAL BIOS files for European consoles. They run games at 50Hz, so they keep European releases in sync. Therefore, pick one of these for PAL games.
Other BIOS Versions by Model and Region
Many more files exist for older and newer models. For example: SCPH-1002, SCPH-3000, SCPH-3500, SCPH-5552, SCPH-7000, SCPH-7002, SCPH-7003, SCPH-7501, SCPH-9002, and the PSone files SCPH-100, SCPH-102A, and SCPH-102B.
There is also a special file called psxonpsp660.bin. This psxonpsp660 bios comes from the PSP system and is region-free. As a result, one file can run US, Japanese, and European games. Some players also say it gives better compatibility. So you can use it in DuckStation or RetroArch like any other PS1 BIOS.
Which PS1 BIOS Should You Use?
For most users, the answer is simple. First, match the BIOS to your game’s region. Next, pick a stable file for that region.
PS1 US BIOS: Why It’s a Top Choice
The US PS1 BIOS, like SCPH1001 or SCPH5501, is the most popular pick. Most PS1 games use the NTSC-U standard, so these files fit a large library. In addition, every major emulator supports them. Therefore, they are a safe default for new users.
Difference Between PS1 and PS2 BIOS
The PS1 BIOS and the PS2 BIOS are not the same. Each one is built for its own console. So using the wrong file causes crashes or missing features.
The PS1 BIOS runs the 32-bit PlayStation 1 and works with ePSXe, DuckStation, and RetroArch. The PS2 BIOS runs the 128-bit PlayStation 2 and works with emulators like PCSX2 and AetherSX2. If you also play PS2 games, see our full PS2 BIOS download guide and our PS2 emulator for PC guide. For older PS2 firmware, we also cover every PS2 BIOS old version.
Can you use a PS2 BIOS for PS1?
No, you cannot. The two files are different and are not interchangeable. If you also play PS2 games, you need a separate PS2 BIOS instead.
Where to Download PS1 BIOS Safely
A ps1 bios download should always come from a clean, trusted source. Bad files can carry malware or break your emulator. So avoid random sites and only use verified files.

USA (NTSC-U)
This is the North American BIOS used for PlayStation games from the USA and Canada.
DownloadEurope (PAL)
This is the official European BIOS for PlayStation games released across Europe, the UK, and Australia.
DownloadJapan NTSC-J
This is the Japanese BIOS made for PlayStation games released in Japan and other parts of Asia.
DownloadWorldwide
This is a universal BIOS that can run PlayStation games from all regions around the world.
DownloadAfter the download finishes, you will get a ZIP file. Inside it, you will find the .bin file you need.
How to Extract the PS1 BIOS from Your Console
You can pull the BIOS straight from your own console. Here is the basic process:
This method keeps you on the safe and legal side. Also, a dumped file tends to work for years across many devices.
Verify Your PS1 BIOS File (MD5 Checksums)
A checksum is a short code that proves a file is correct. So before you use any BIOS, check its hash. If the hash matches a known value, the file is clean and complete. If it does not match, the file is wrong or corrupted.
To check the hash, use a simple command. On Windows, run certutil -hashfile SCPH1001.bin MD5. On macOS or Linux, run md5sum SCPH1001.bin. Then compare the result to the table below.
| File | Model & version | Region | MD5 checksum |
|---|---|---|---|
| scph1001.bin | SCPH-1001 (v2.2, 12/04/95) | USA (NTSC-U) | 924e392ed05558ffdb115408c263dccf |
| scph1001.bin | SCPH-1001 (v2.0, 05/07/95) | USA (NTSC-U) | dc2b9bf8da62ec93e868cfd29f0d067d |
| scph5501.bin | SCPH-5501 (v3.0, 11/18/96) | USA (NTSC-U) | 490f666e1afb15b7362b406ed1cea246 |
| scph7001.bin | SCPH-7001 (v4.1, 12/16/97) | USA (NTSC-U) | 1e68c231d0896b7eadcad1d7d8e76129 |
| scph101.bin | SCPH-101 (v4.4, 03/24/00) | USA (PSone) | 6e3735ff4c7dc899ee98981385f6f3d0 |
| scph5500.bin | SCPH-5500 (Japan) | Japan (NTSC-J) | 8dd7d5296a650fac7319bce665a6a53c |
| scph5502.bin | SCPH-5502 (Europe) | Europe (PAL) | 32736f17079d0b2b7024407c39bd3050 |
| psxonpsp660.bin | From PSP (region-free) | All regions | c53ca5908936d412331790f4426c6c33 |
Most tools, like DuckStation, RetroArch, Batocera, and Recalbox, check BIOS files by MD5. So the MD5 value matters most. For the popular SCPH-1001 (v2.2), the SHA-1 is also 10155d8d6e6e832d6ea66db9bc098321fb5e8ebf if you prefer to check that way.
SCPH1001.bin and DTL-H1001: Avoid the Wrong File
Here is a point that confuses many users. Not every file named scph1001.bin is the same. In fact, Sony shipped more than one firmware version under the SCPH-1001 name. The two common ones are Version 2.0 (05/07/95) and Version 2.2 (12/04/95). Both are genuine US BIOS files.
However, the Version 2.0 image is shared with the DTL-H1001 debug console. The DTL-H1001 was a “blue” developer unit, not a retail console. So some BIOS packs and databases mix up the names. As a result, your hash may not match one guide even when the file is fine.
The fix is simple. Just check your MD5 against the table above. If it matches any value there, your BIOS is valid. So you do not need to worry about the exact label on the file.
Preparing the PS1 BIOS File
Setup is quick, and you only do it once per emulator. First, extract the archive so the .bin file is visible. Next, place the file in a dedicated folder named bios. Then, leave the file name as it is. Finally, point each emulator to that folder.
A single central BIOS folder makes life easier. So you can reuse it for ePSXe, DuckStation, and RetroArch at the same time.
Supported PS1 Emulators (Windows, Android, and iOS)
Many strong emulators support the PS1 BIOS. The best options are:
How to Install and Set Up PS1 BIOS on Emulators
This section shows clear steps for each emulator. First, get the correct BIOS file. Next, follow the steps for your tool.
Common Preparations
Before you start, do these three things. First, confirm your file is a clean .bin (not a ZIP). Next, match the BIOS region to your game. Then, save it in a folder you can find, like C:\Emulators\BIOS\PS1 on PC.
PS1 BIOS in DuckStation
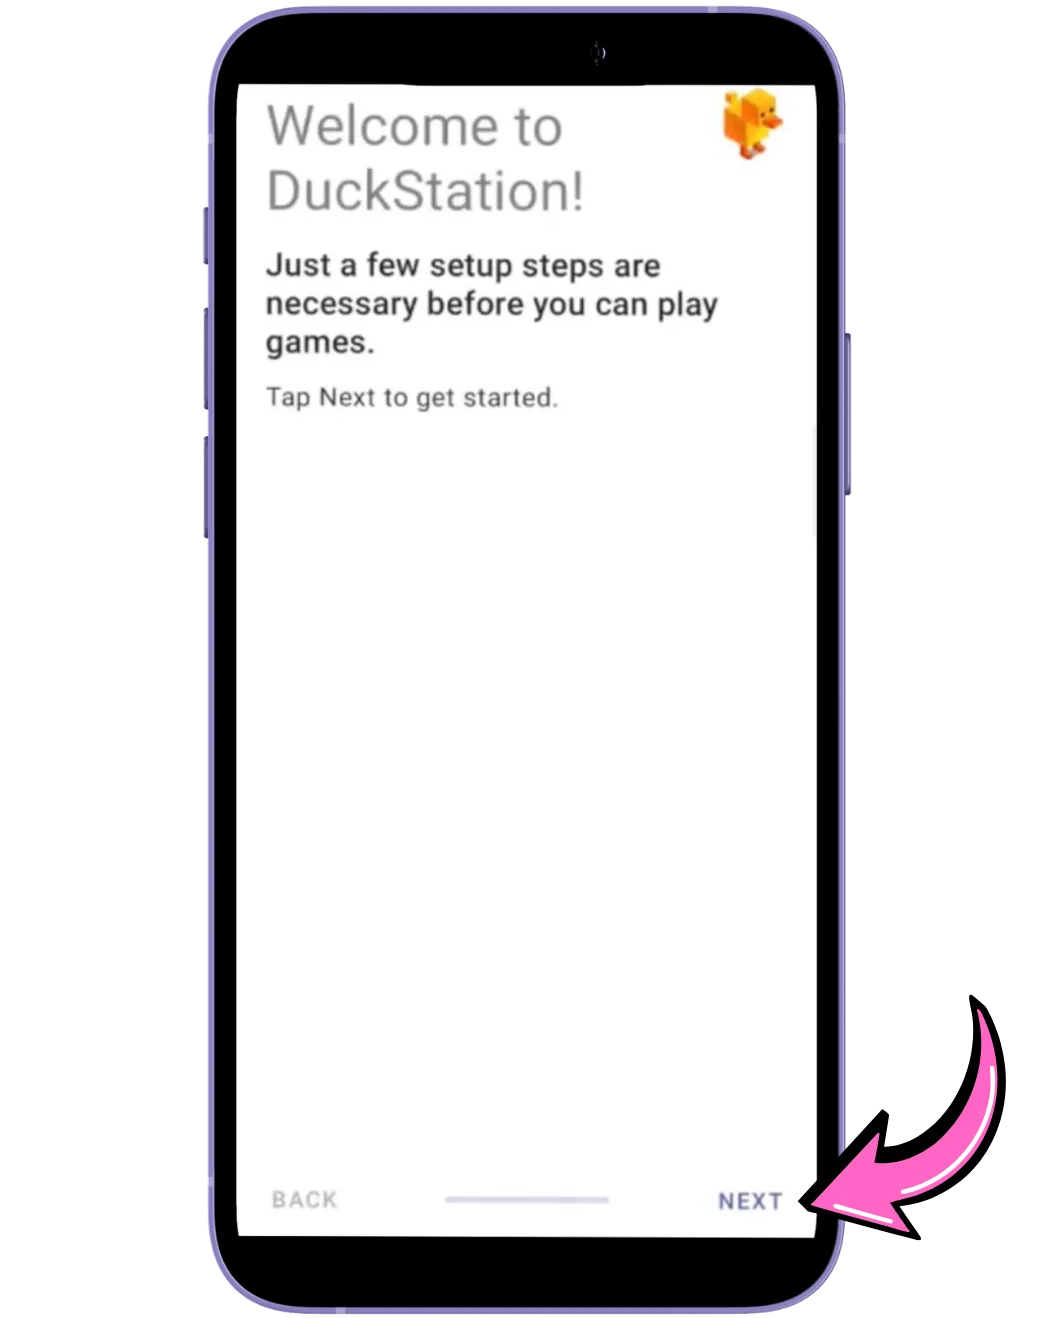
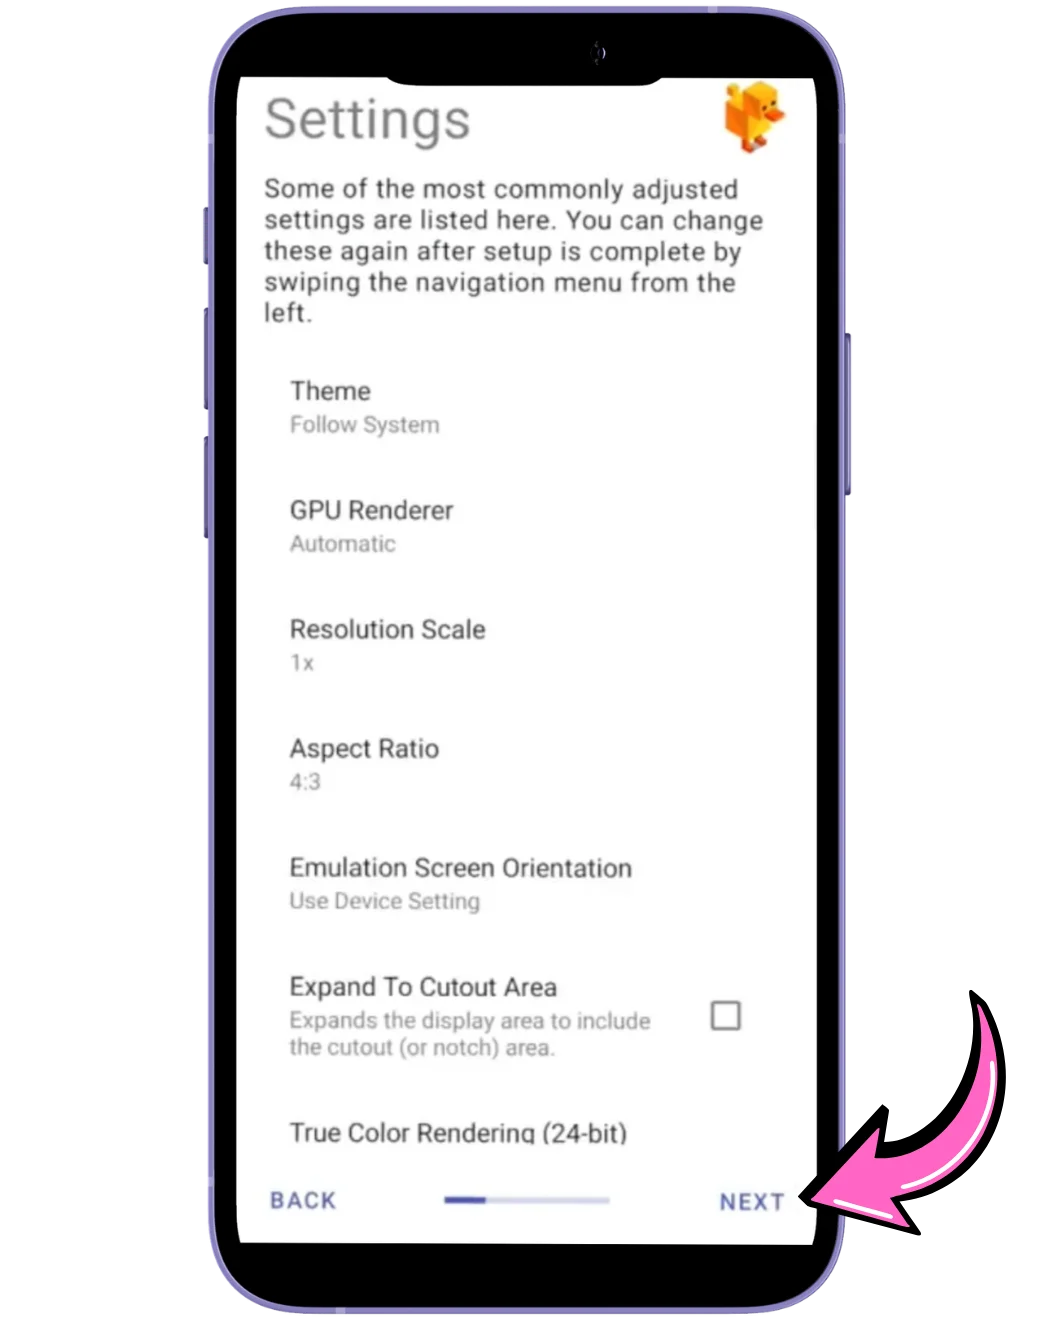
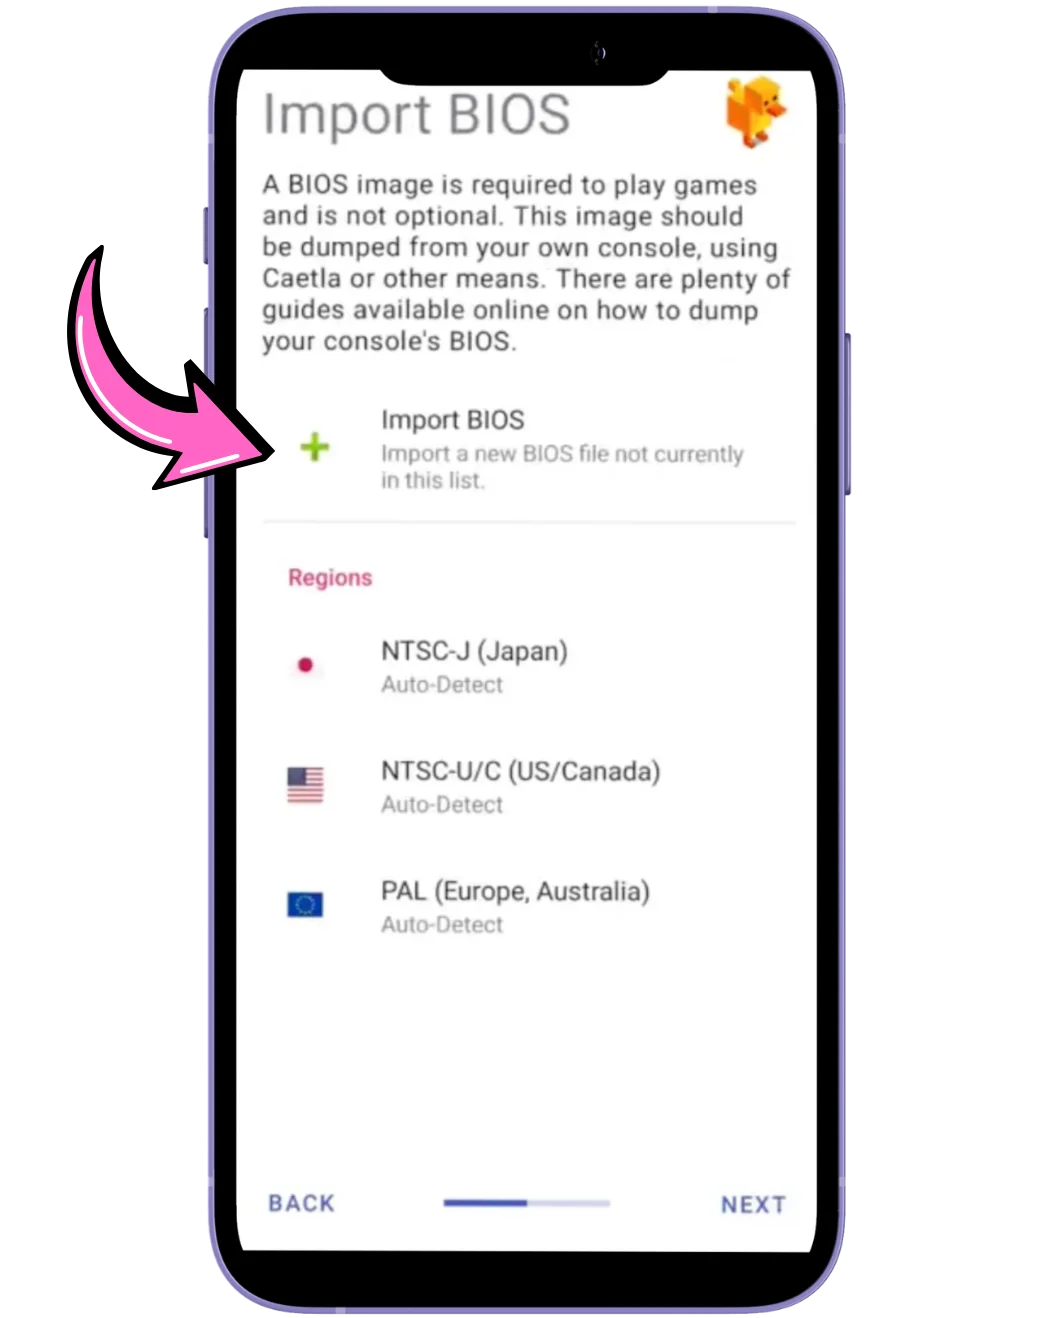
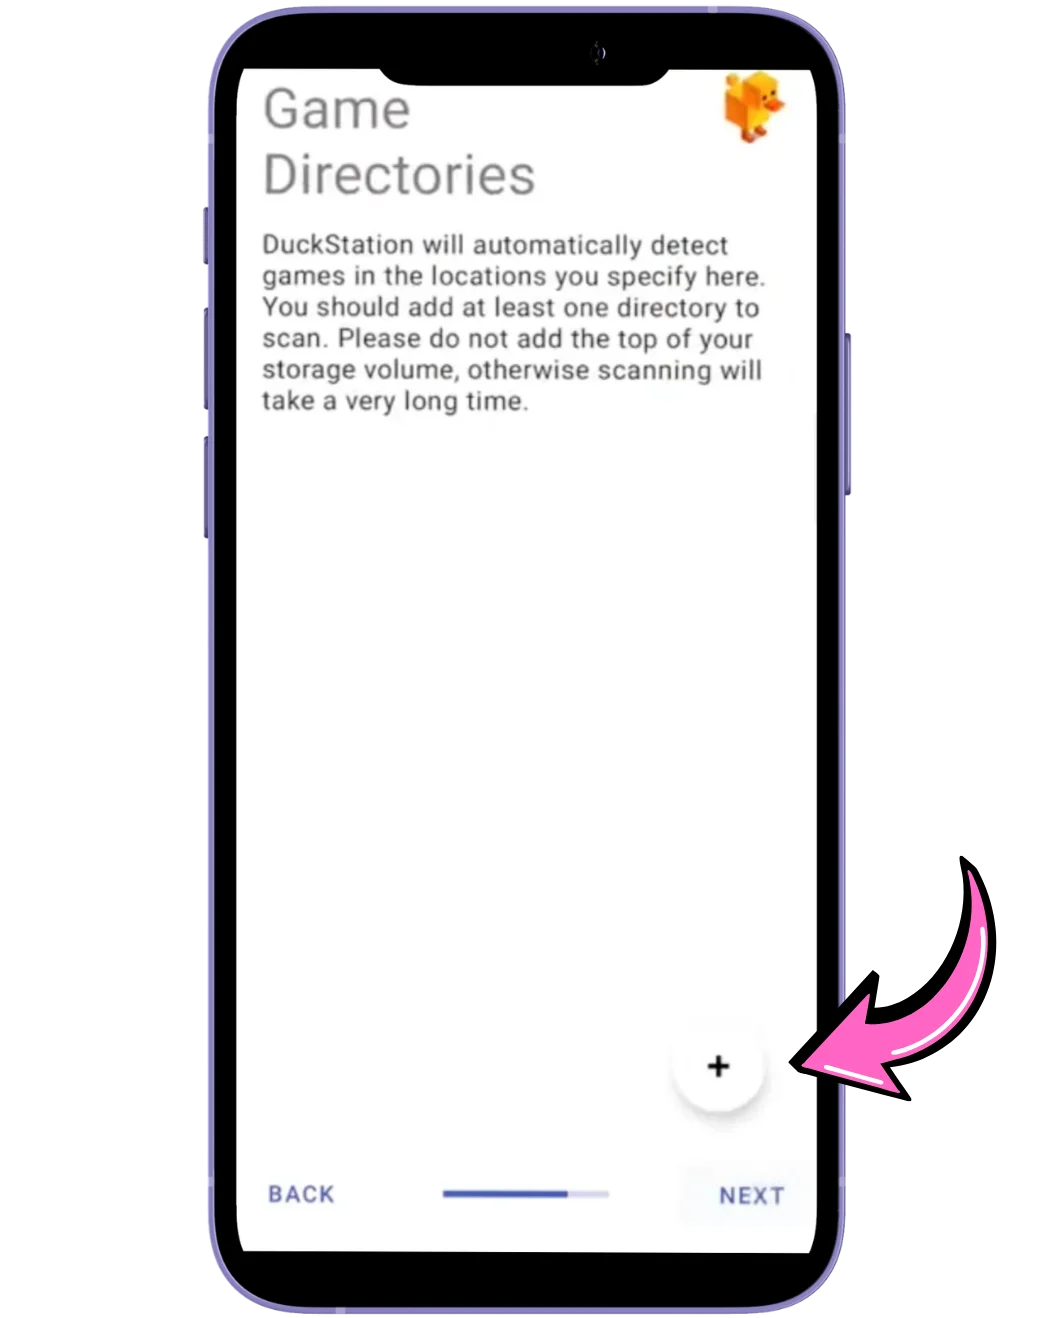
The DuckStation BIOS setup is short because the emulator scans for files for you. To set up the PS1 BIOS DuckStation way, follow these steps:
For PC:
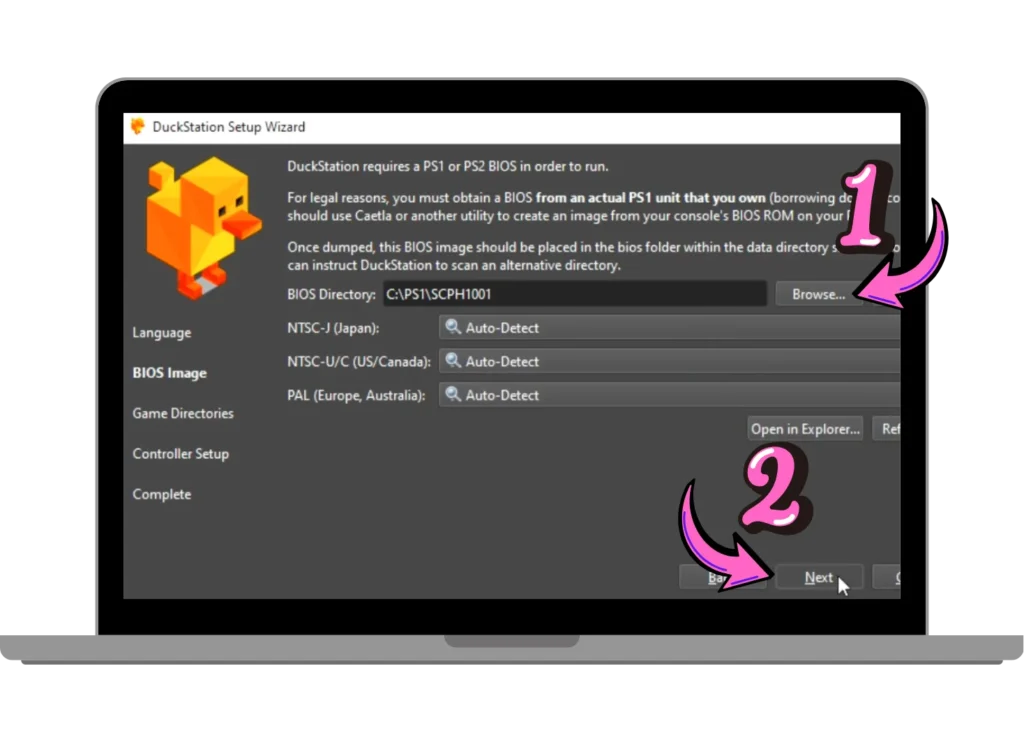
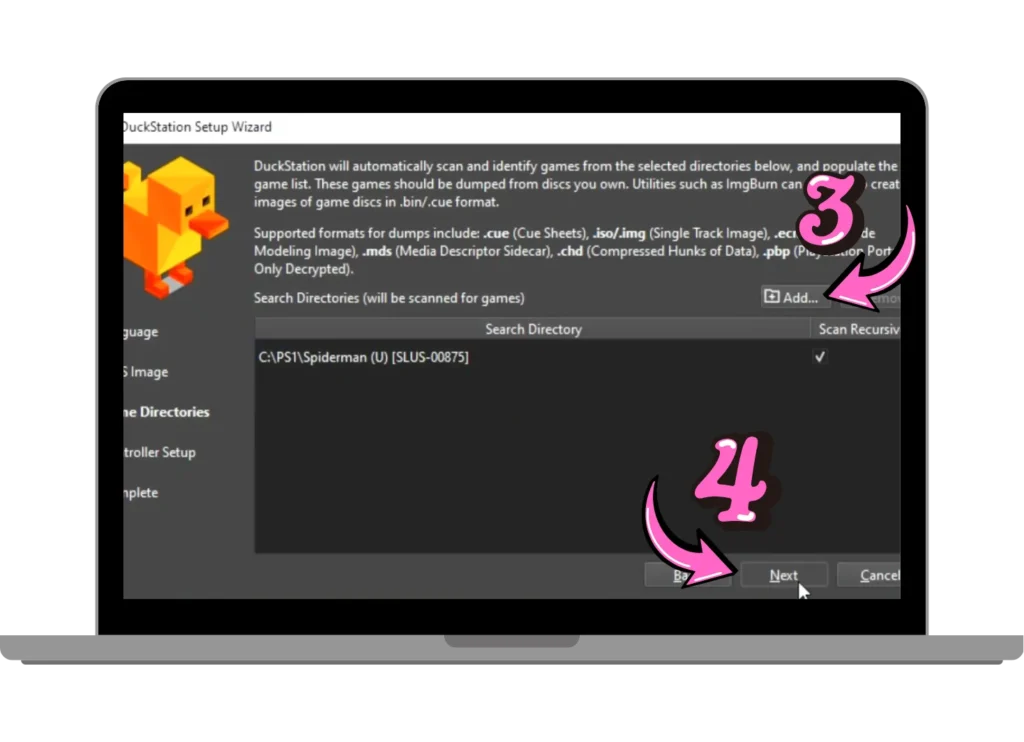
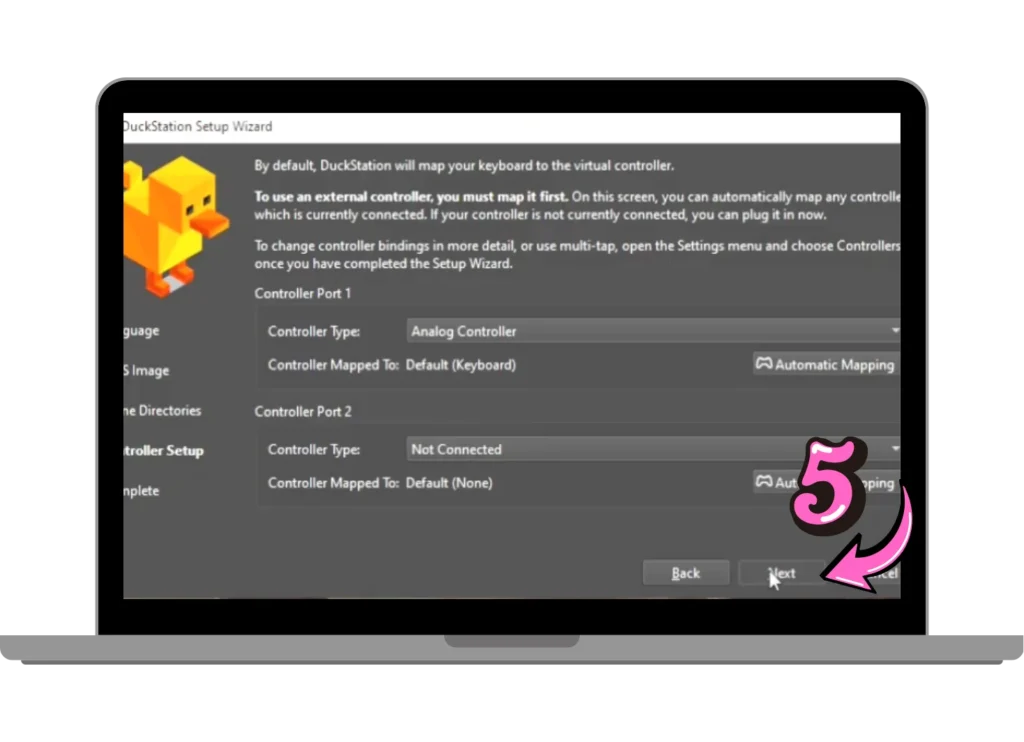
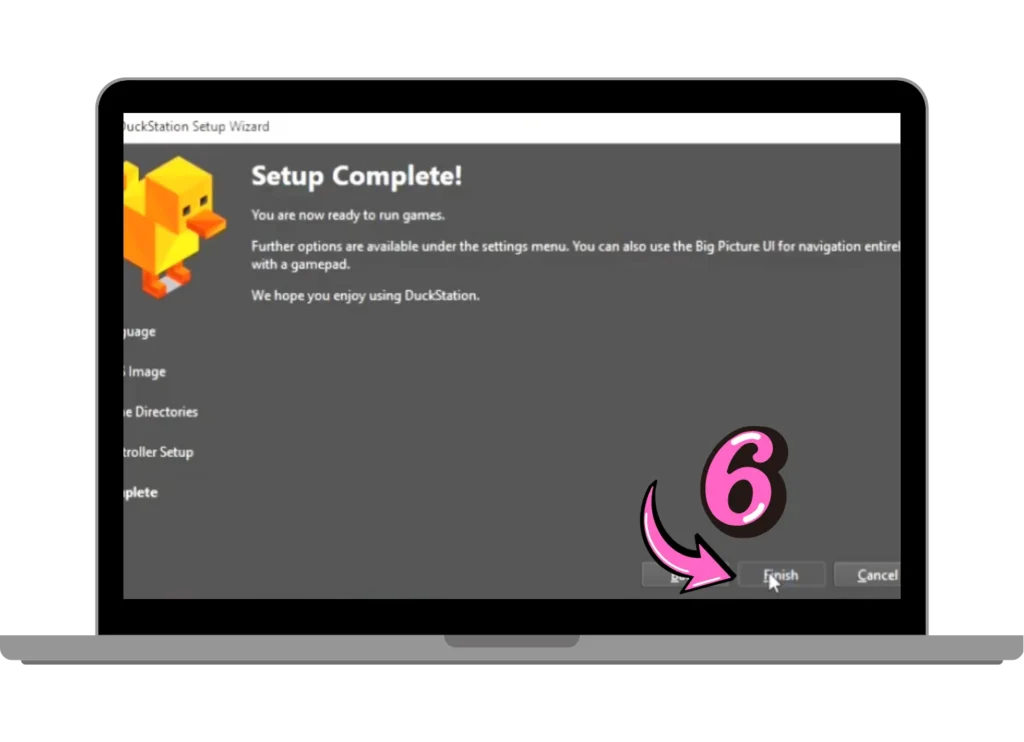
For better visuals, also turn on PGXP geometry correction and raise the internal resolution. As a result, games look sharper while staying stable.
For Android:
PS1 BIOS in ePSXe
The epsxe bios steps are slightly different but still easy. To set up the PS1 BIOS for epsxe, do this:
For PC:
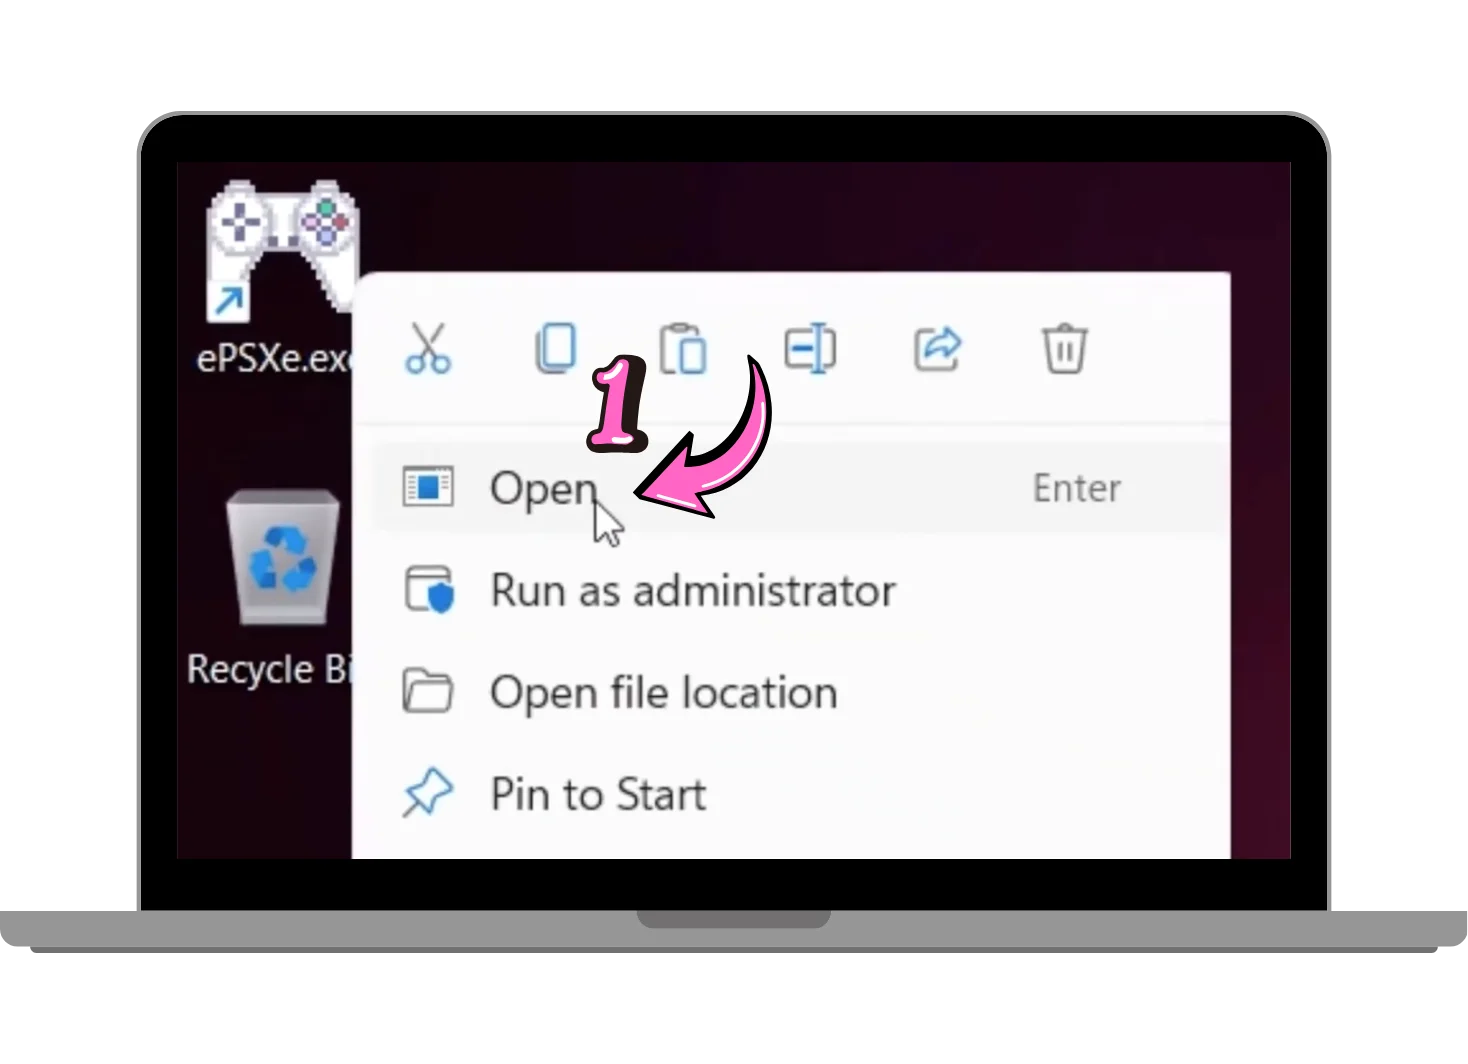
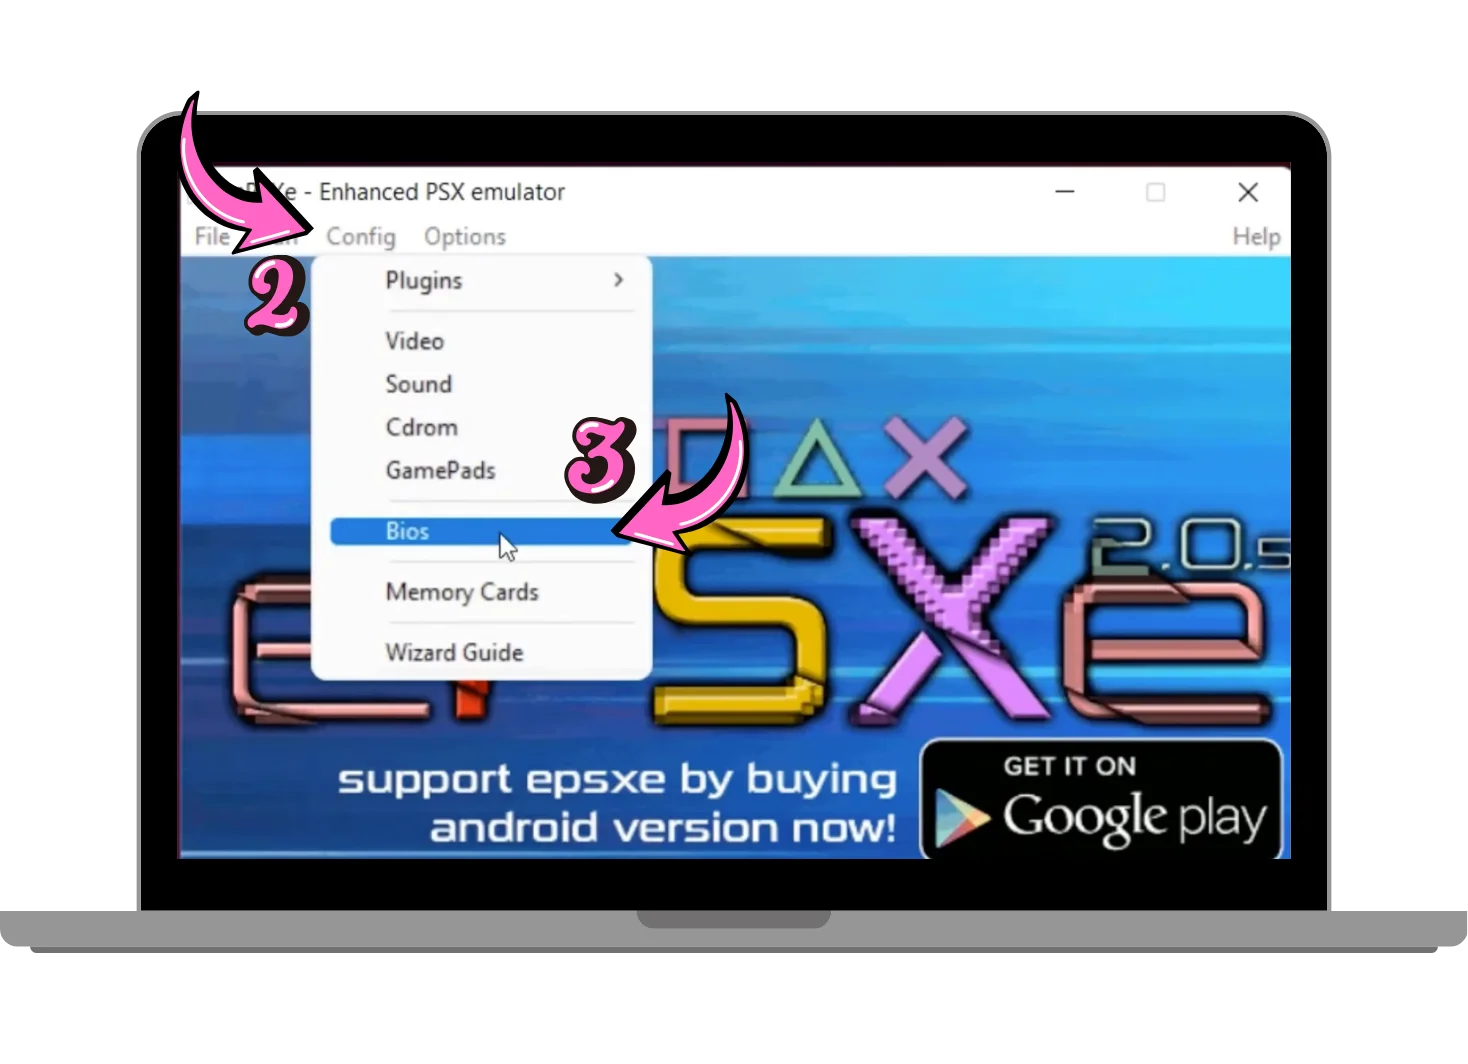
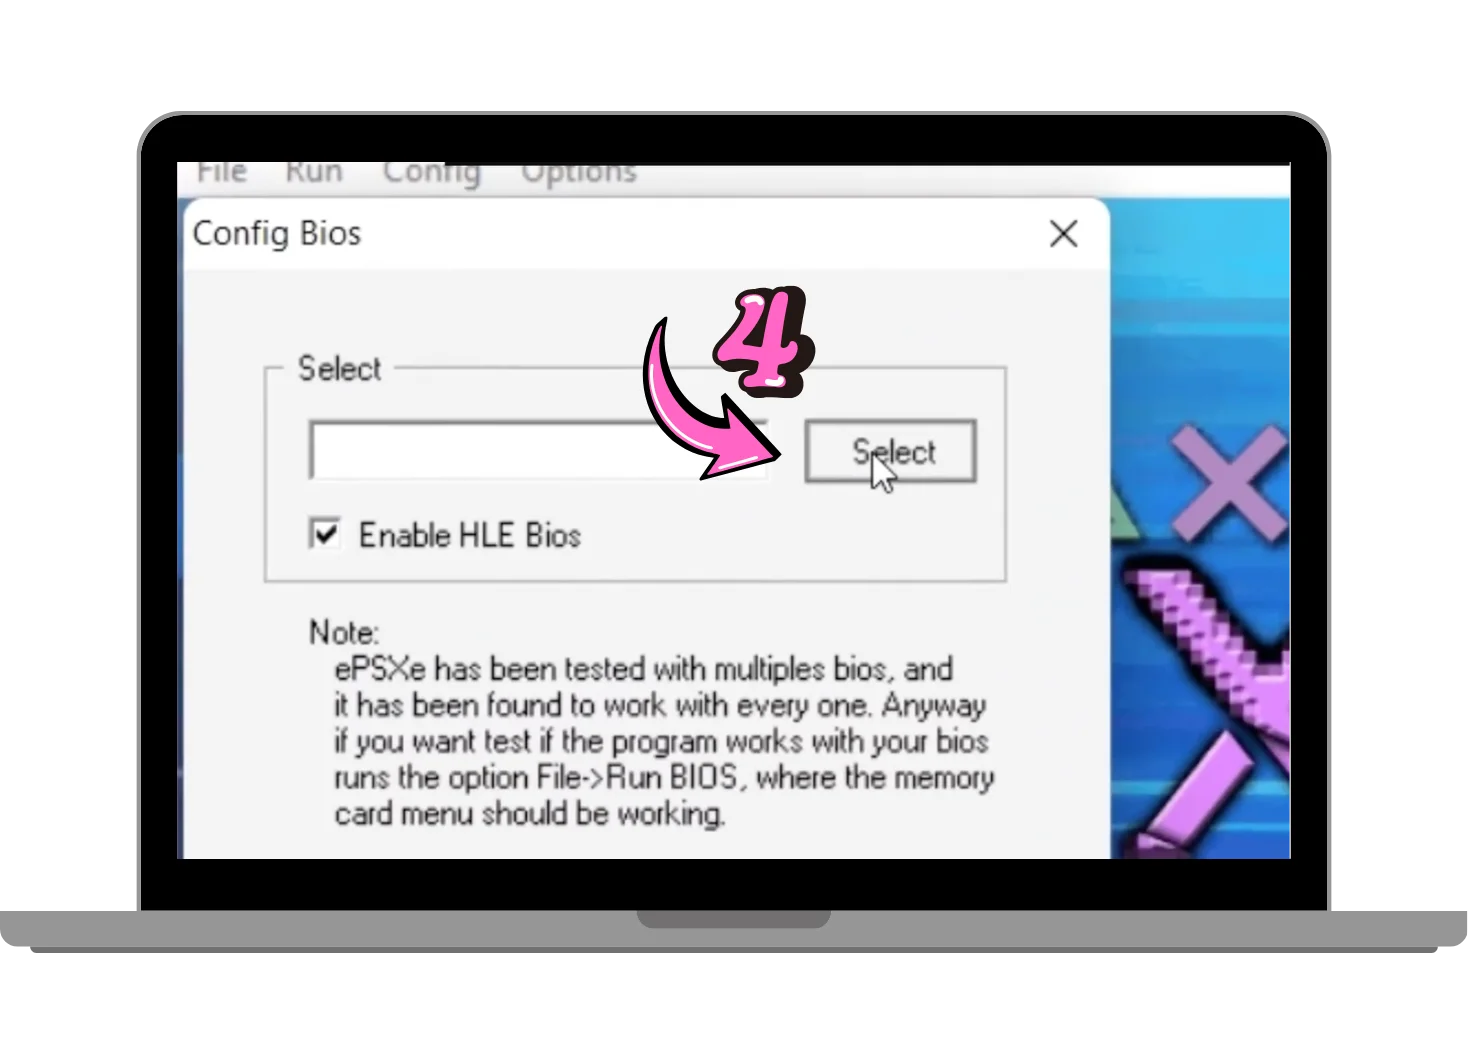
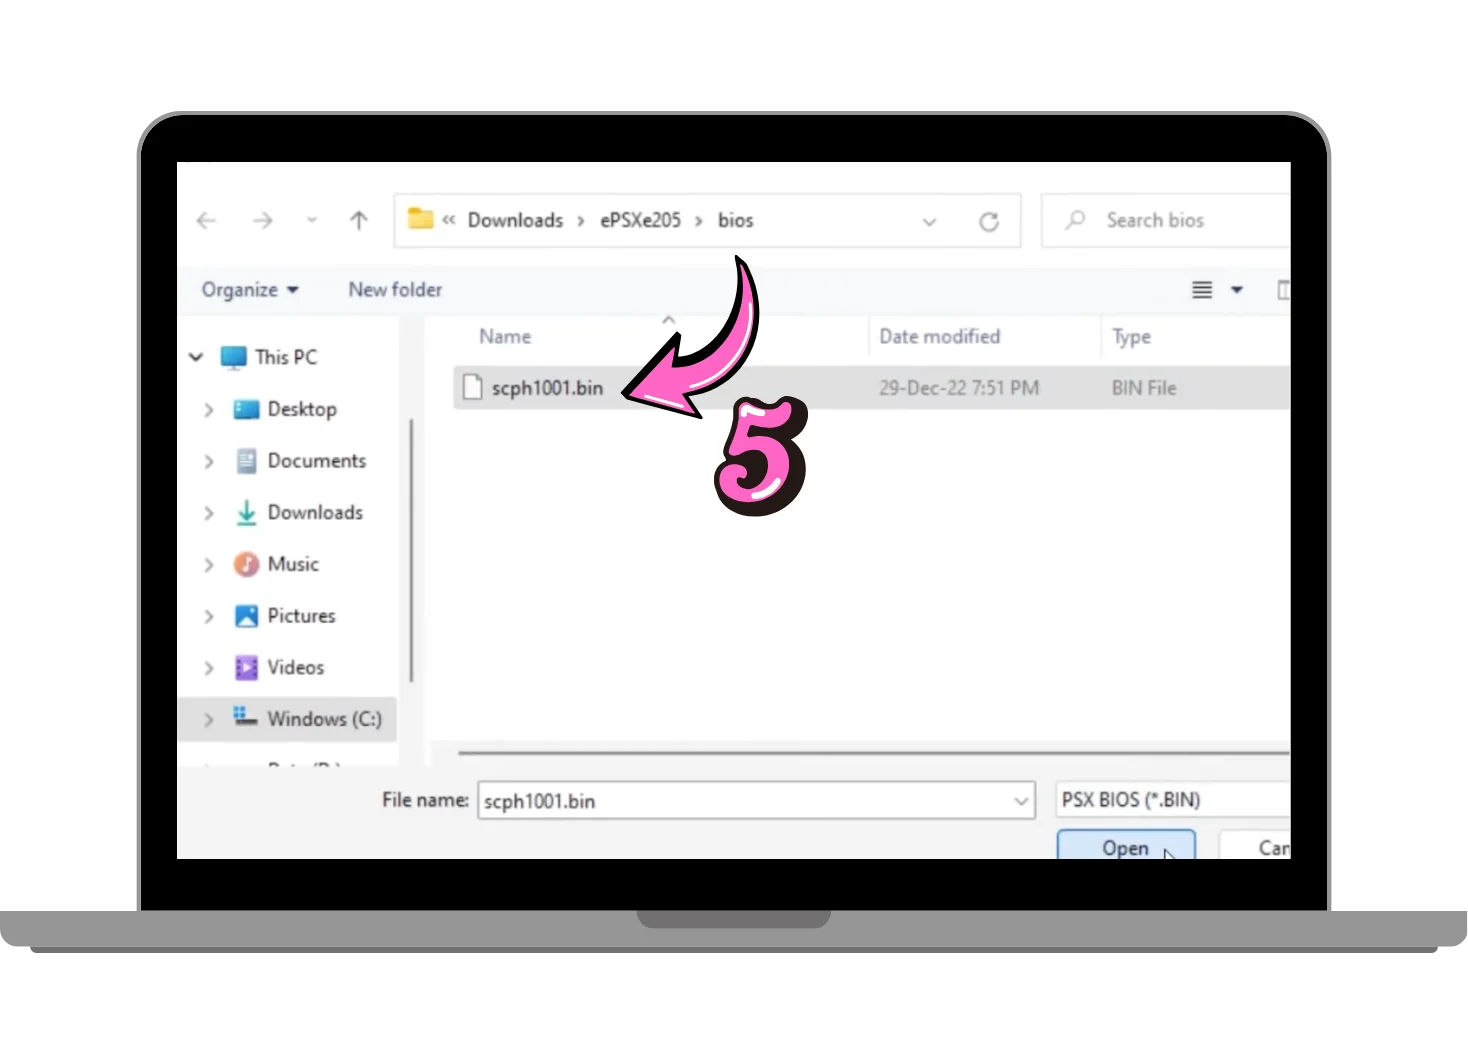
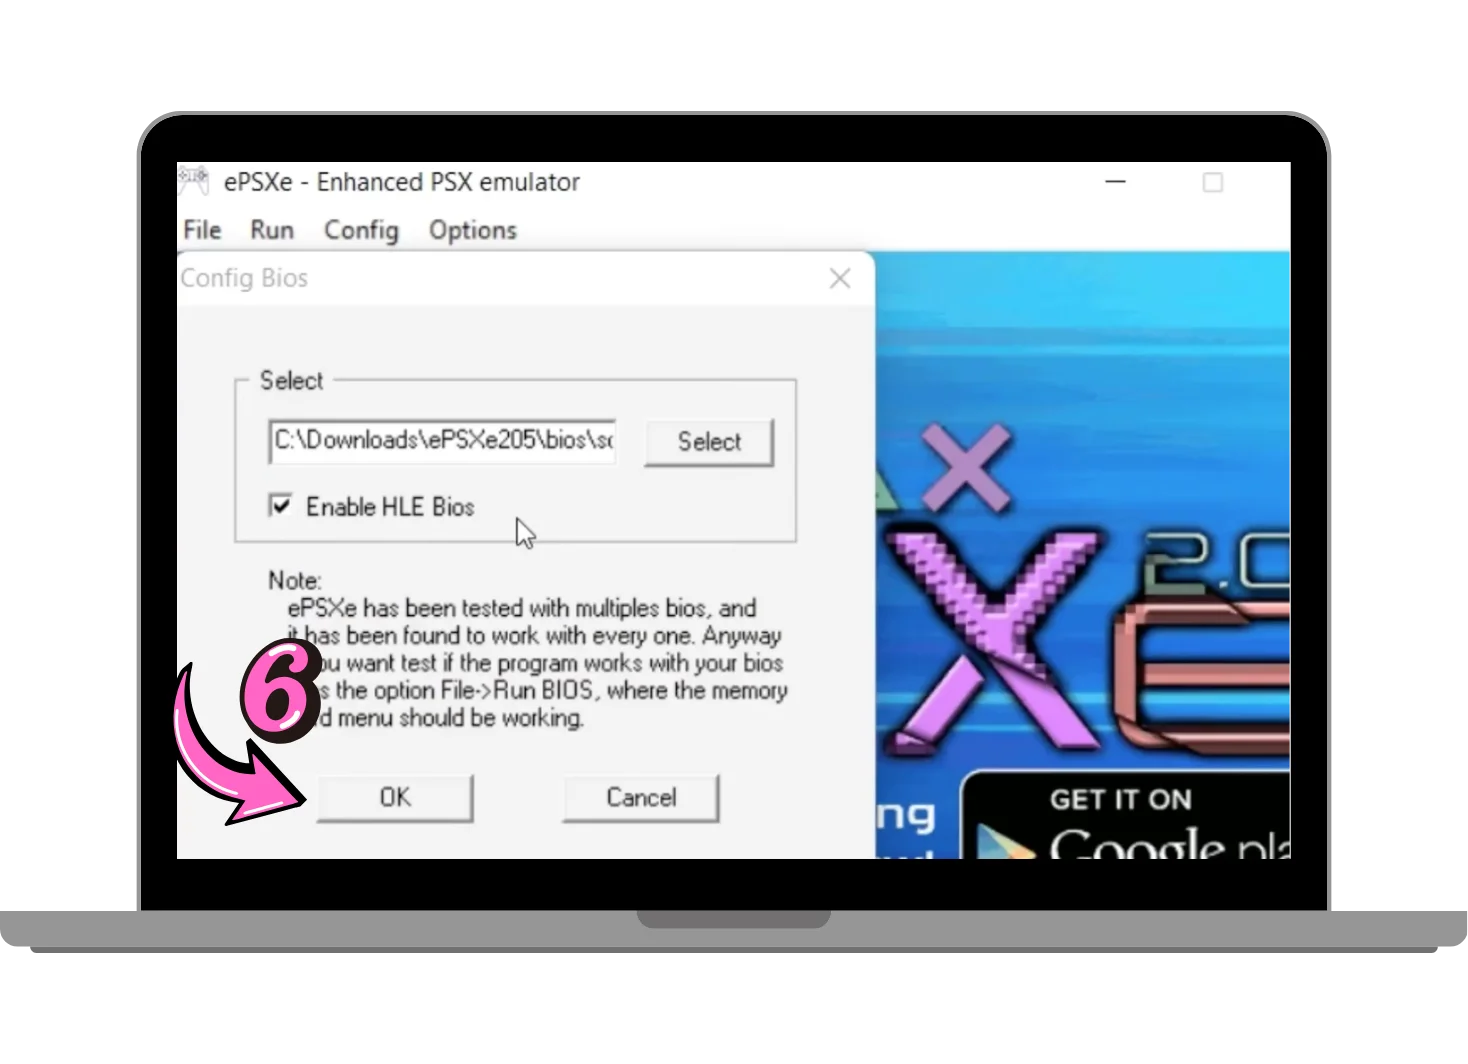
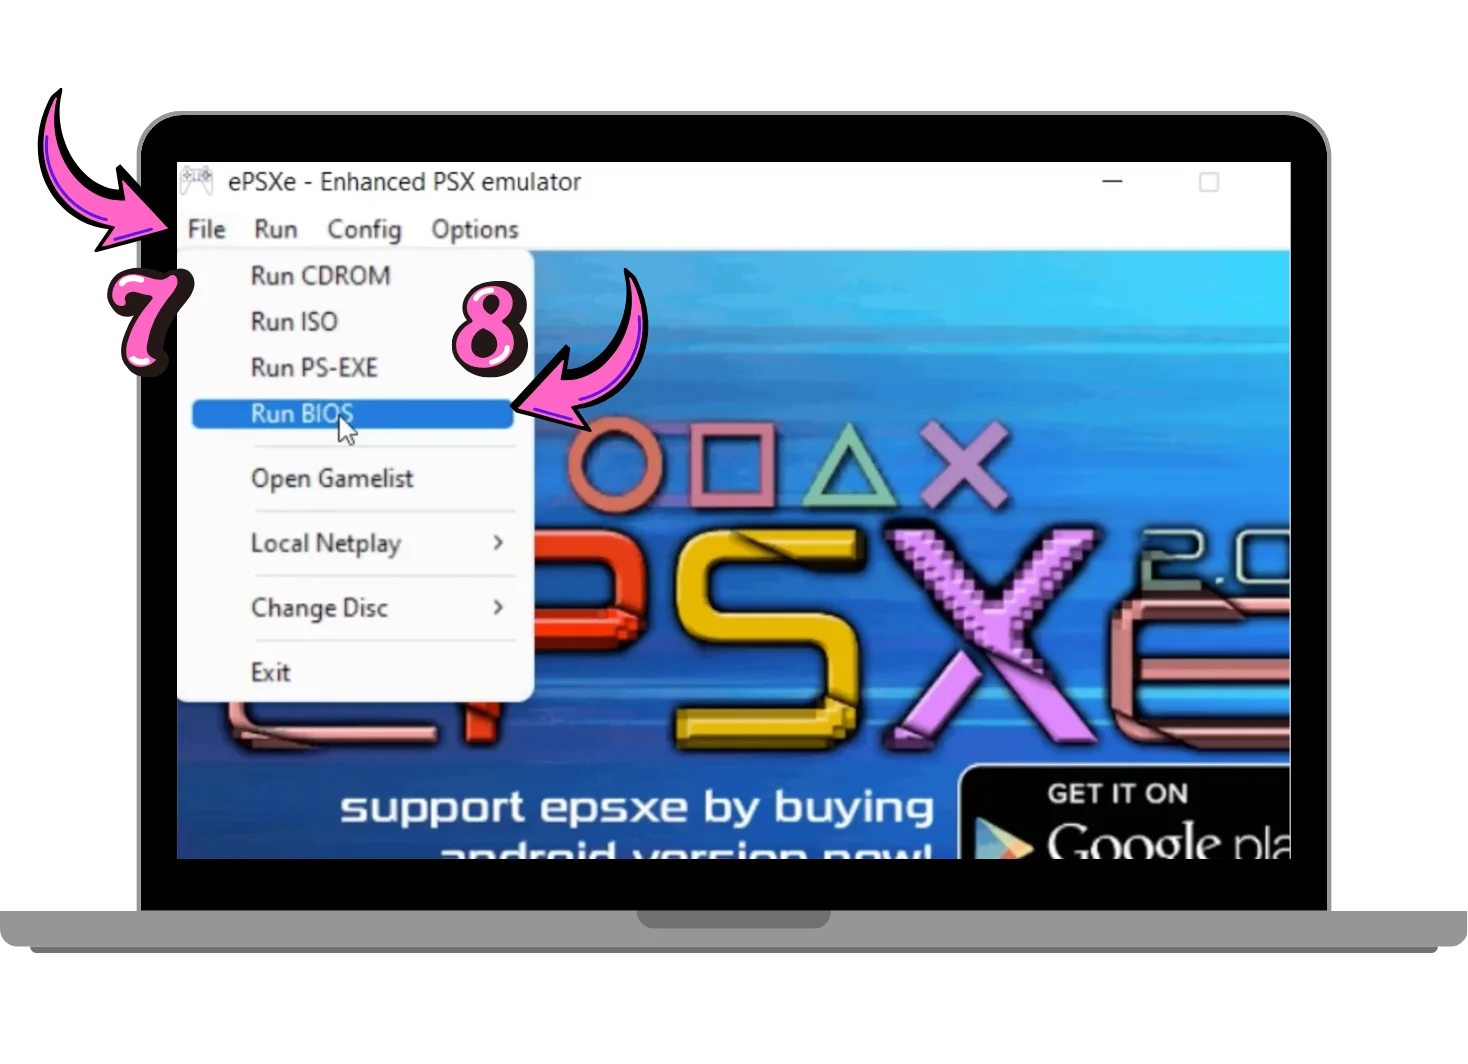
For Android:
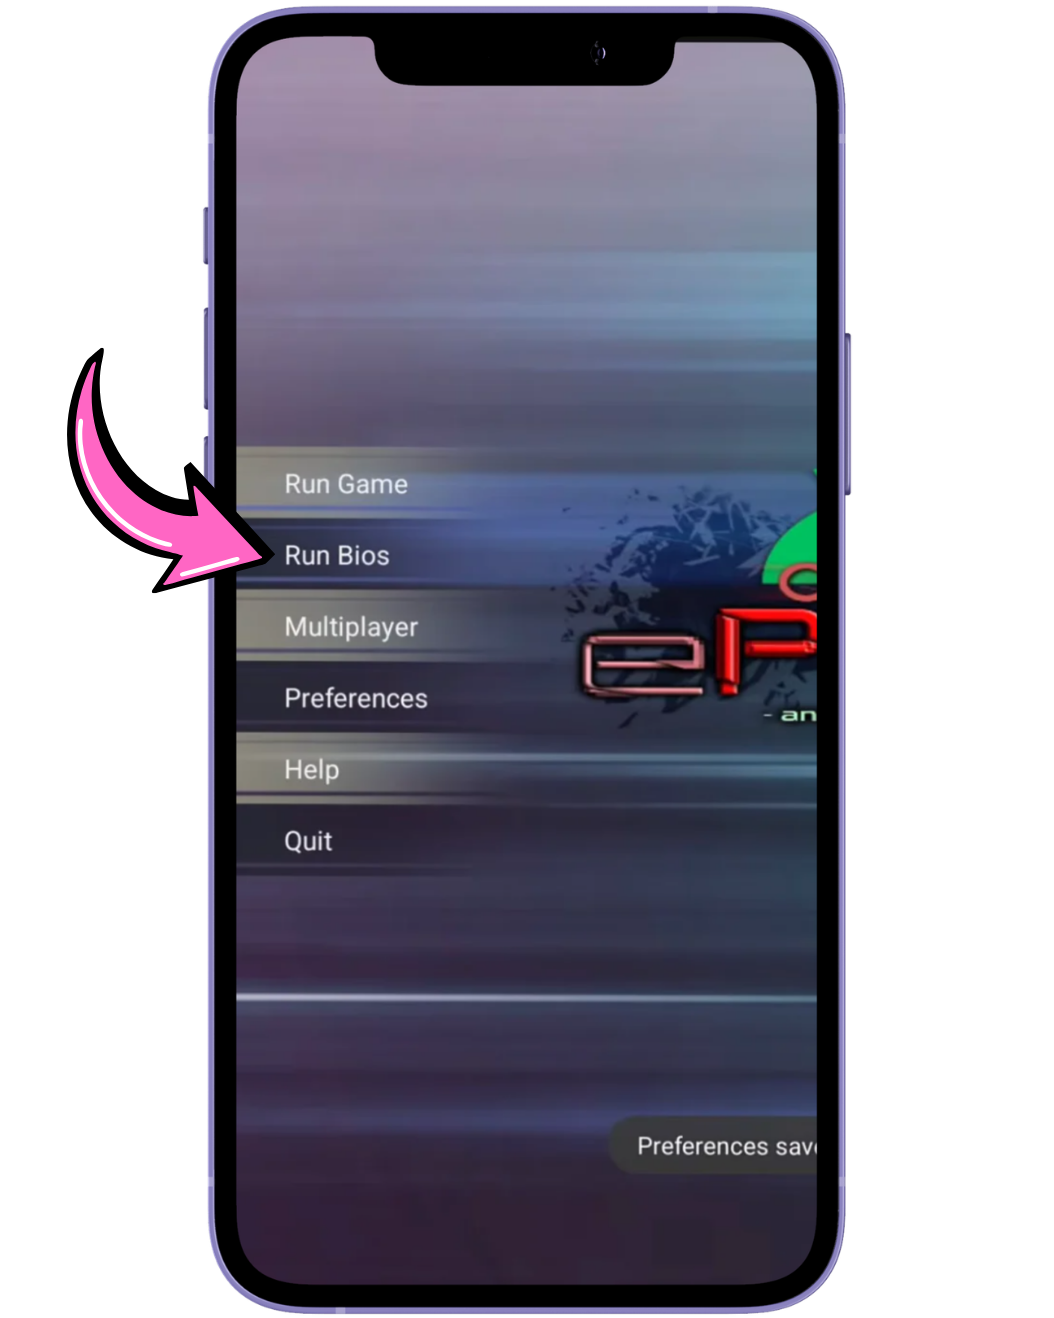
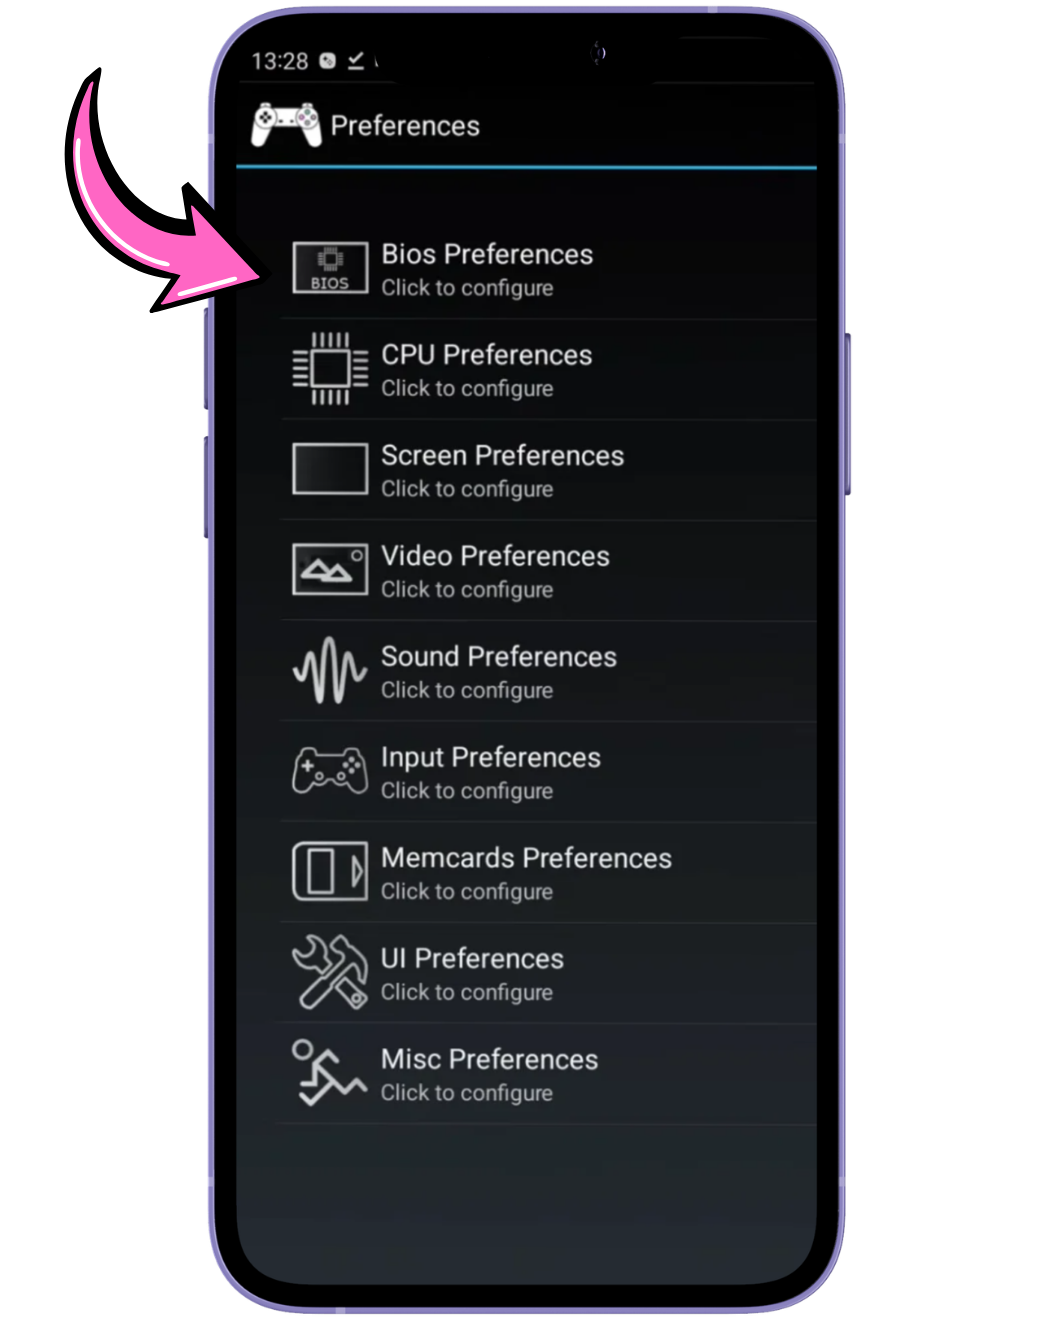
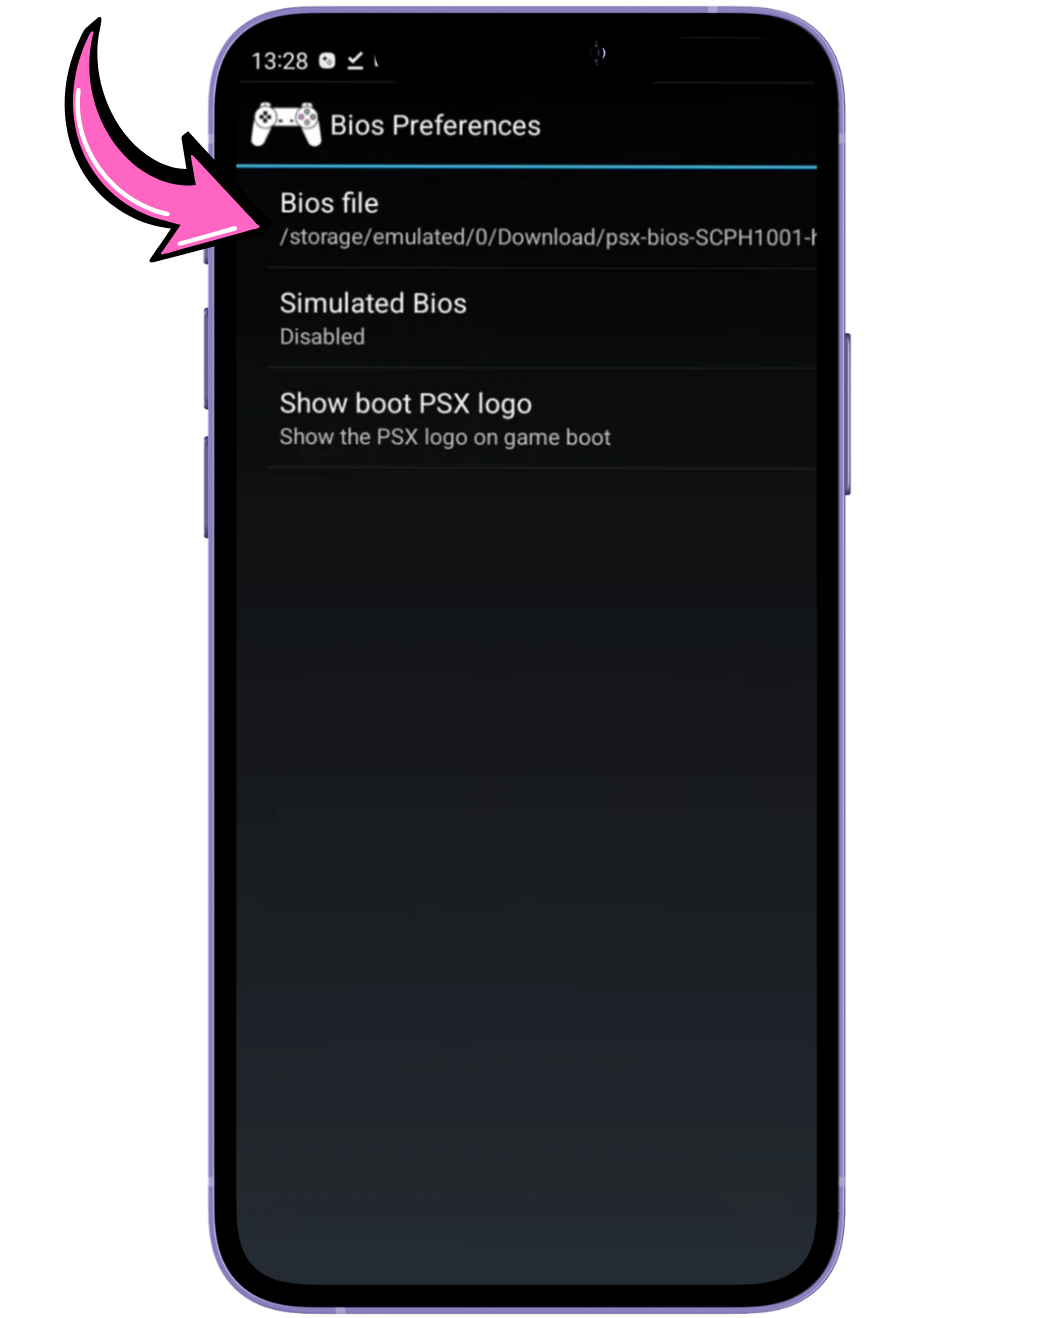
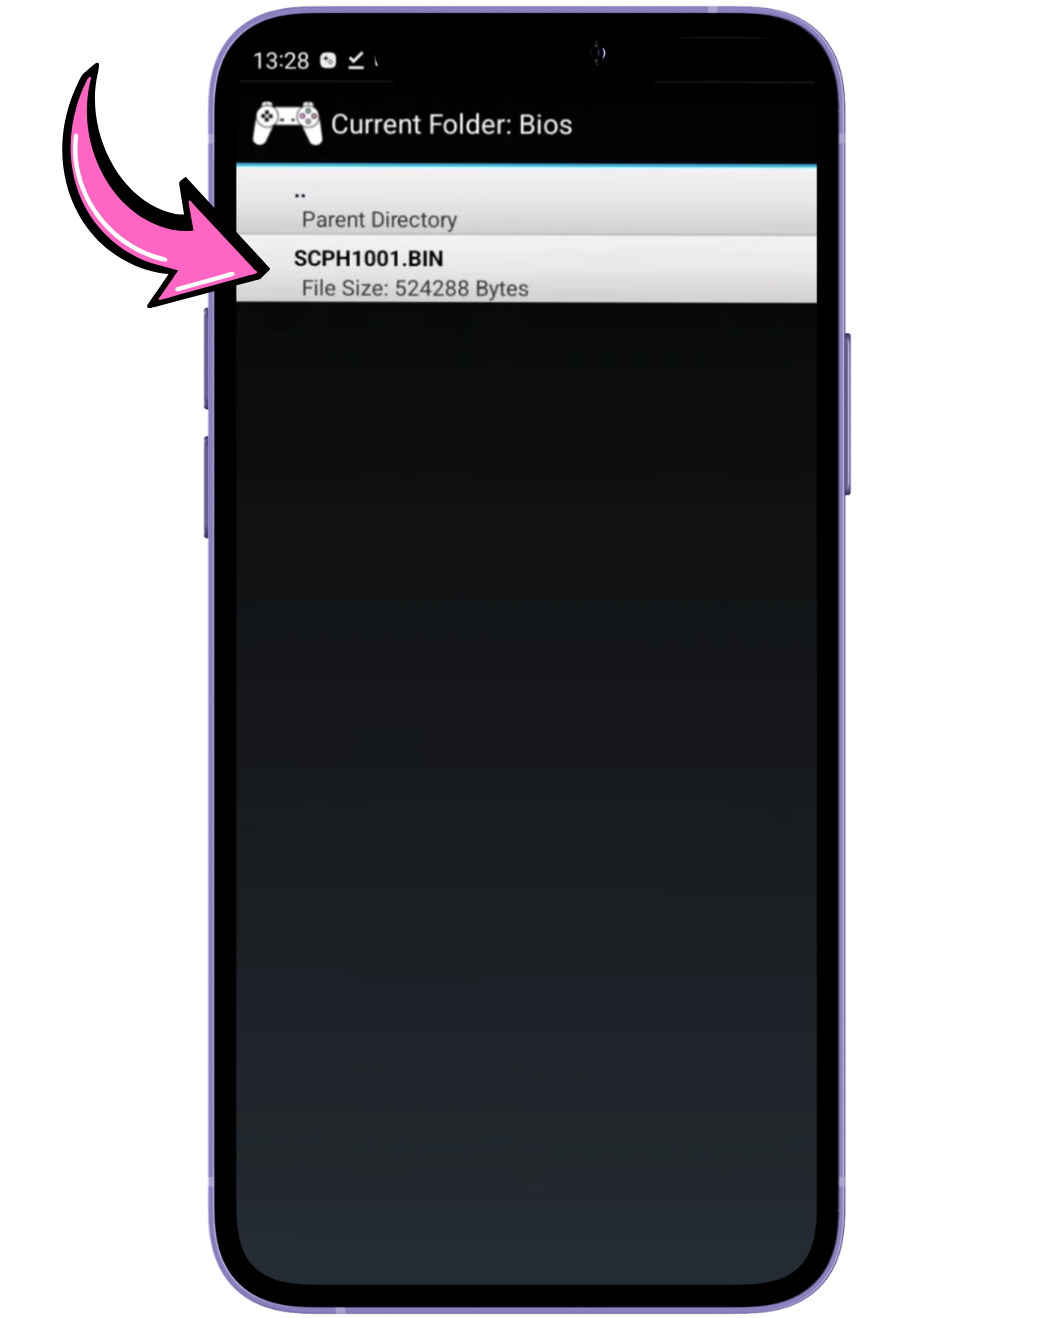
PS1 BIOS in RetroArch (Swanstation)
RetroArch needs the BIOS in its system folder. So follow these steps:
For PC:
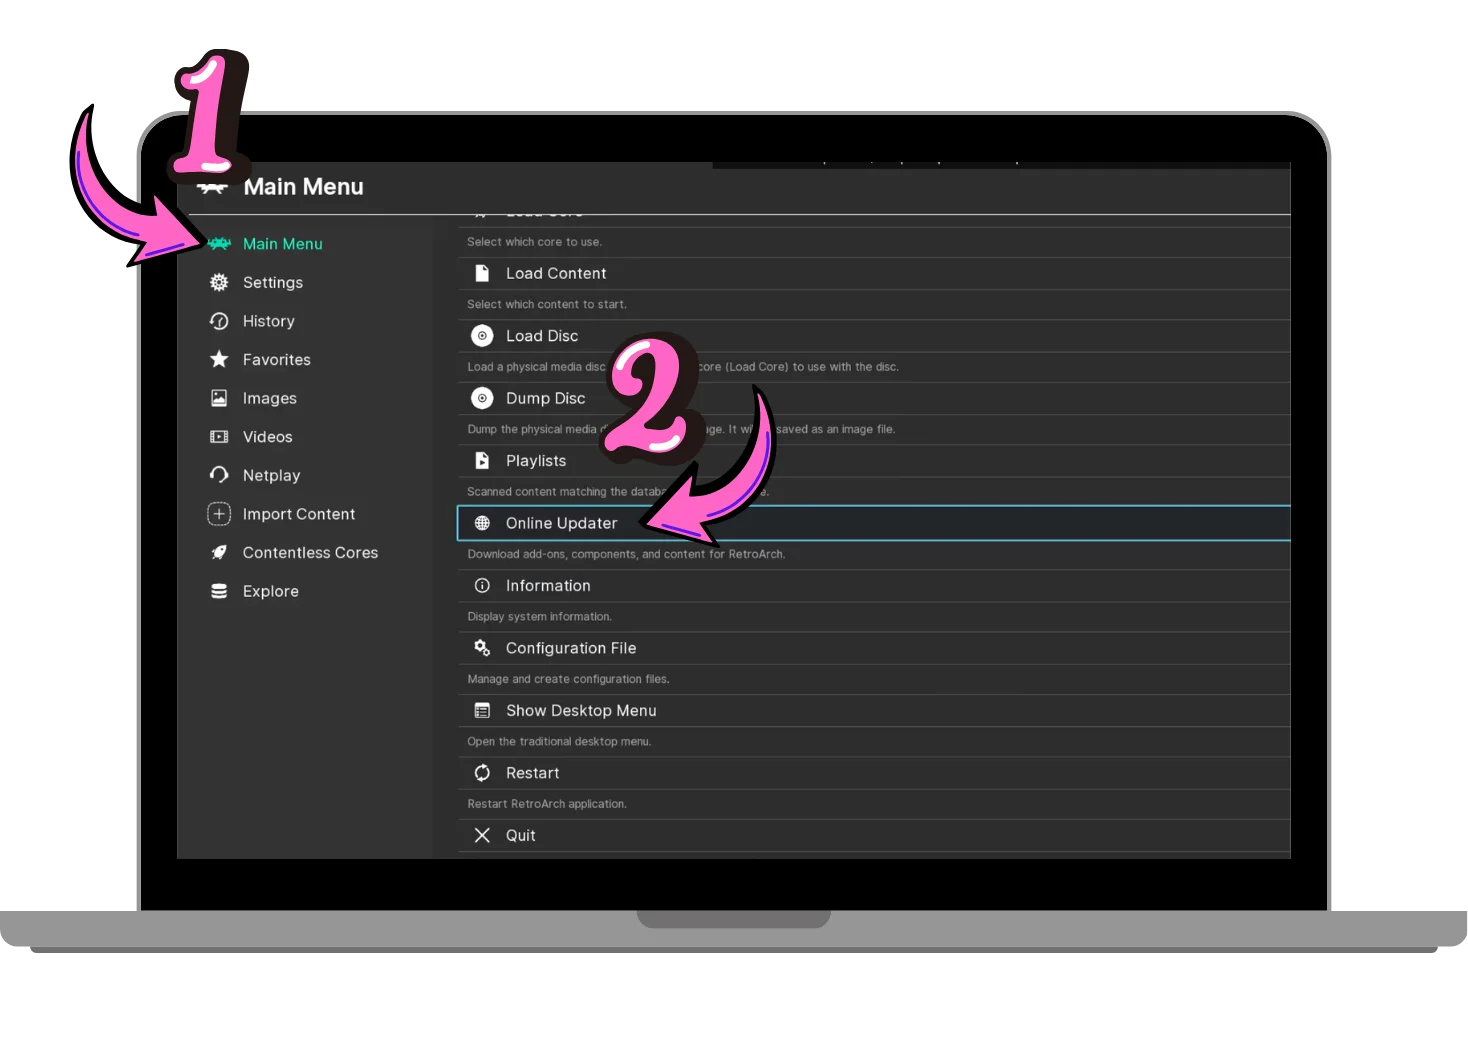
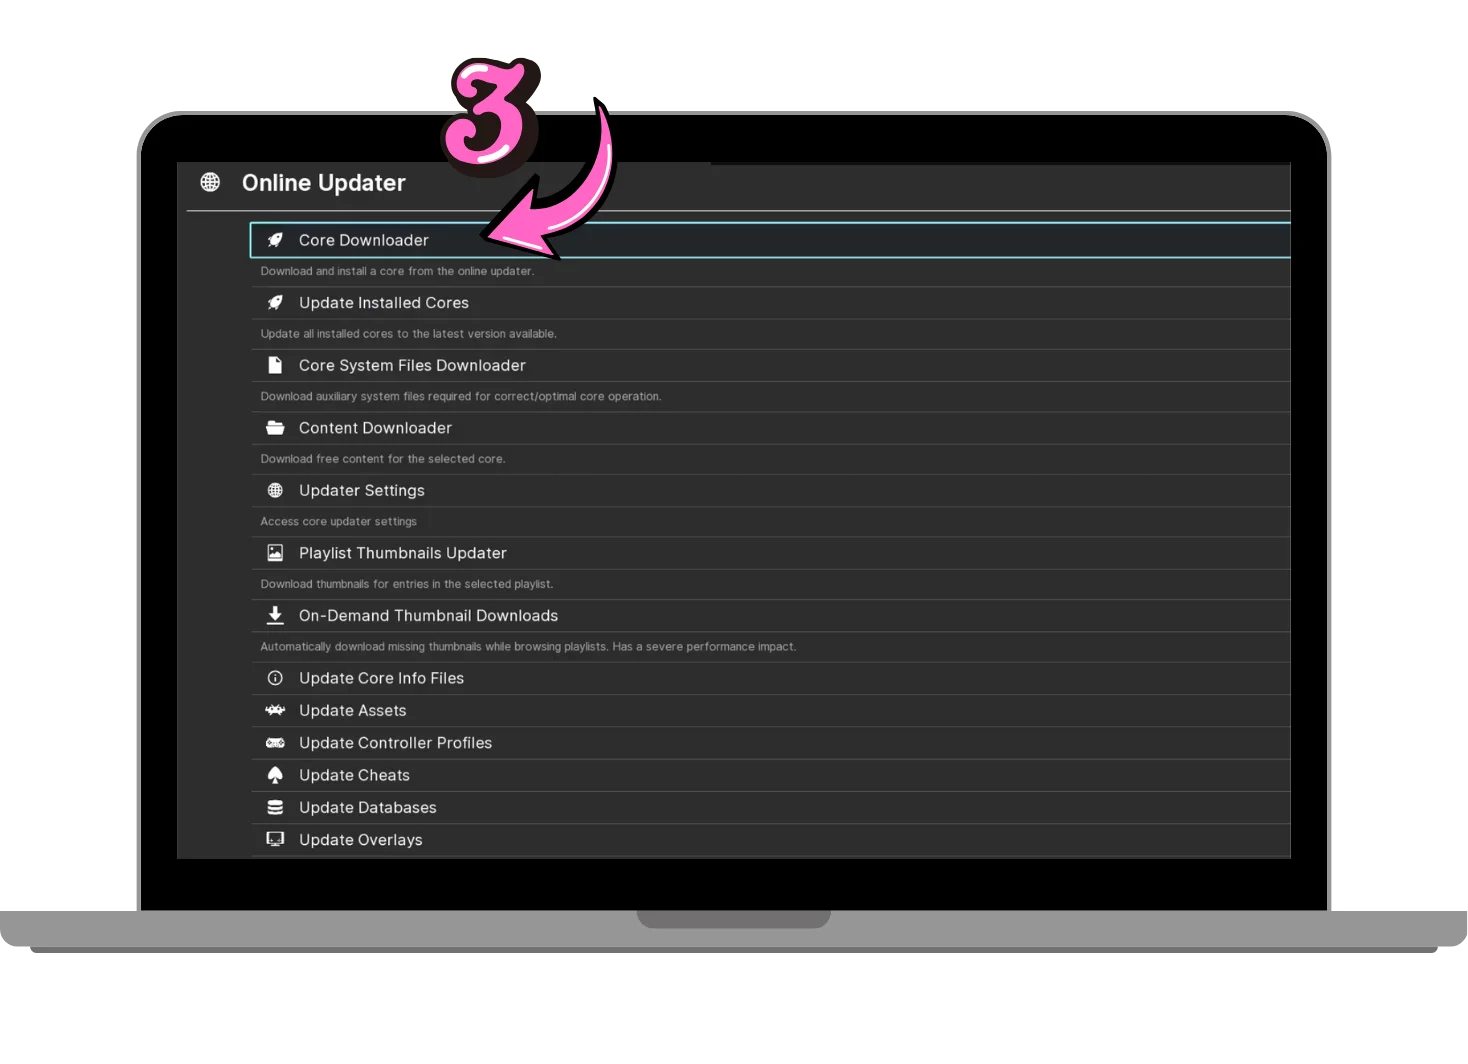
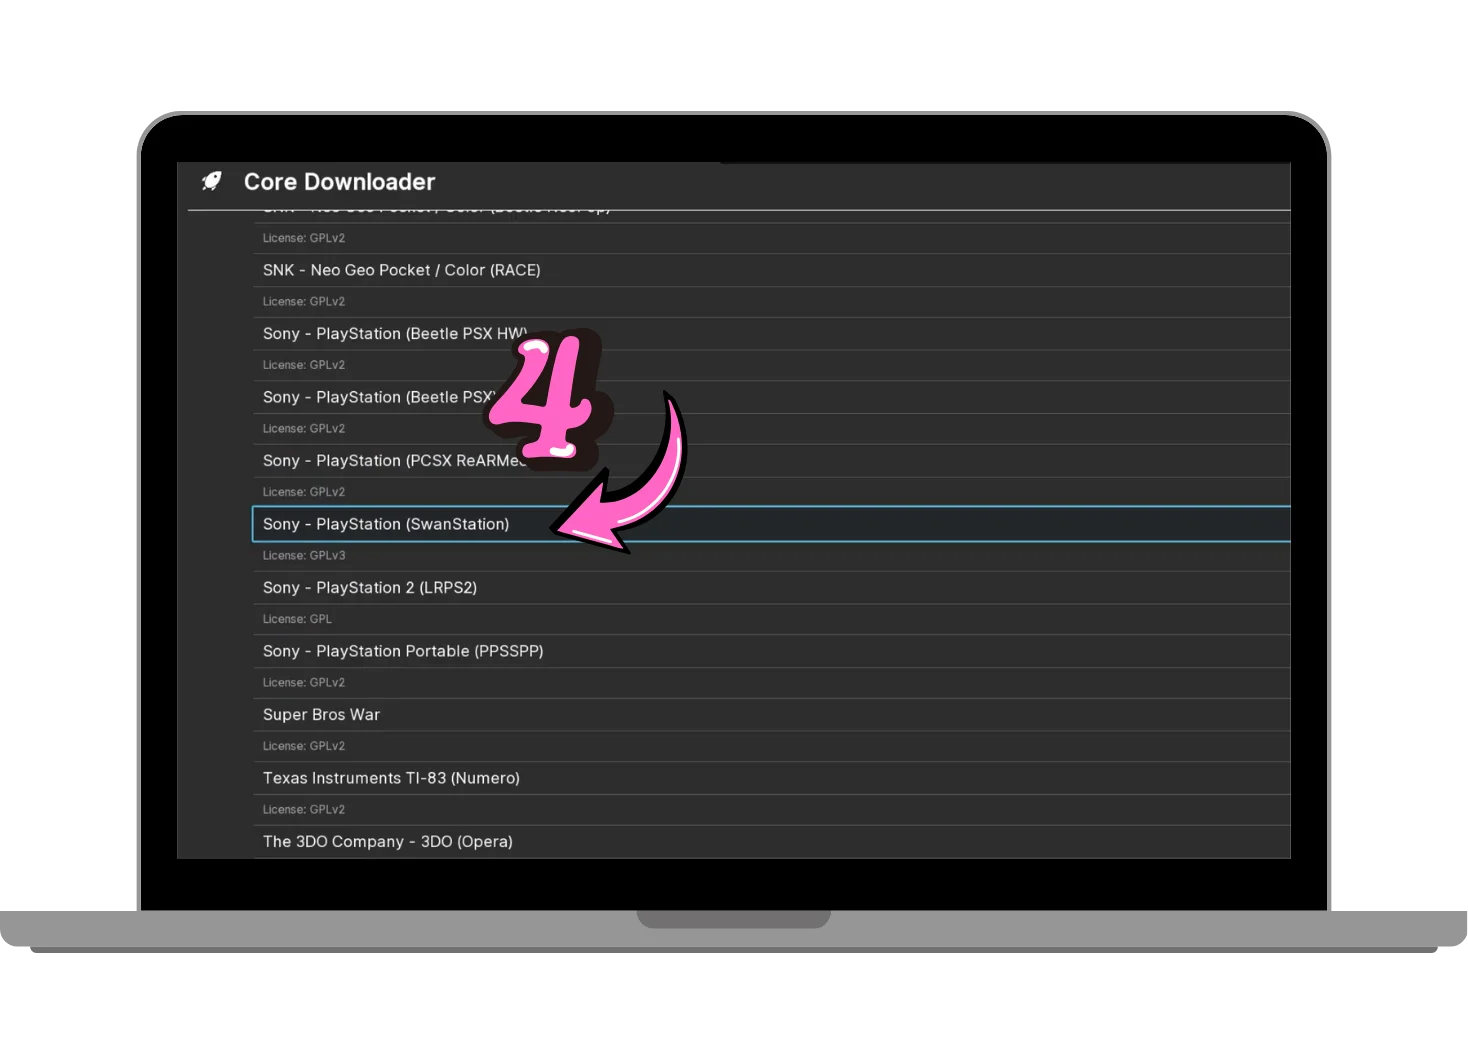
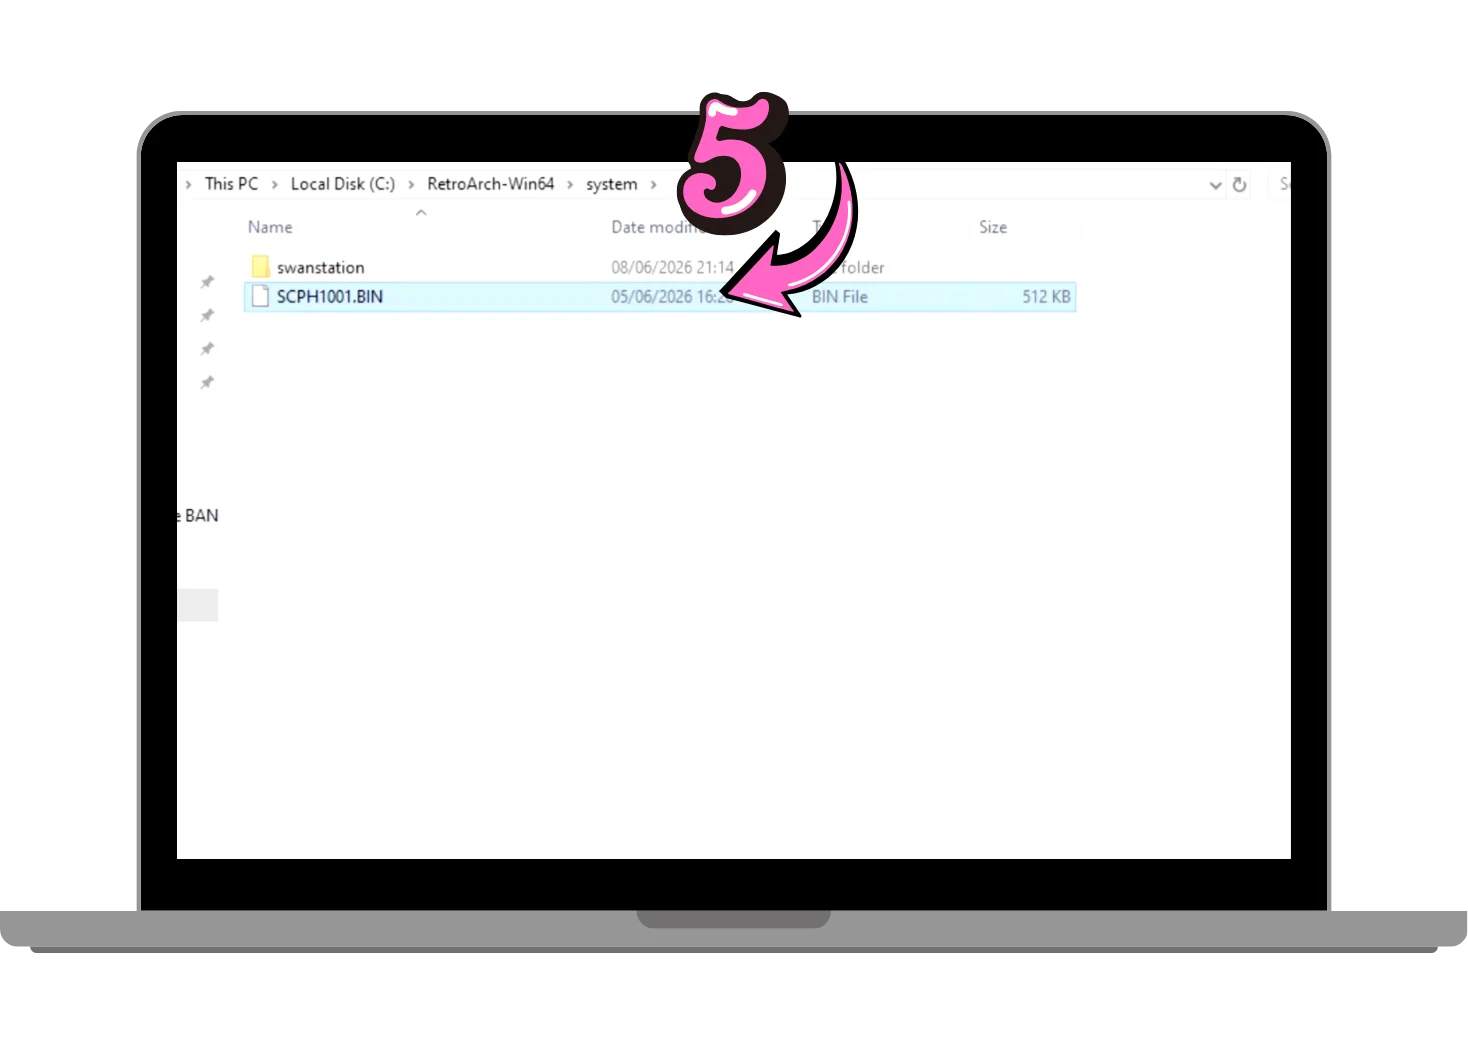
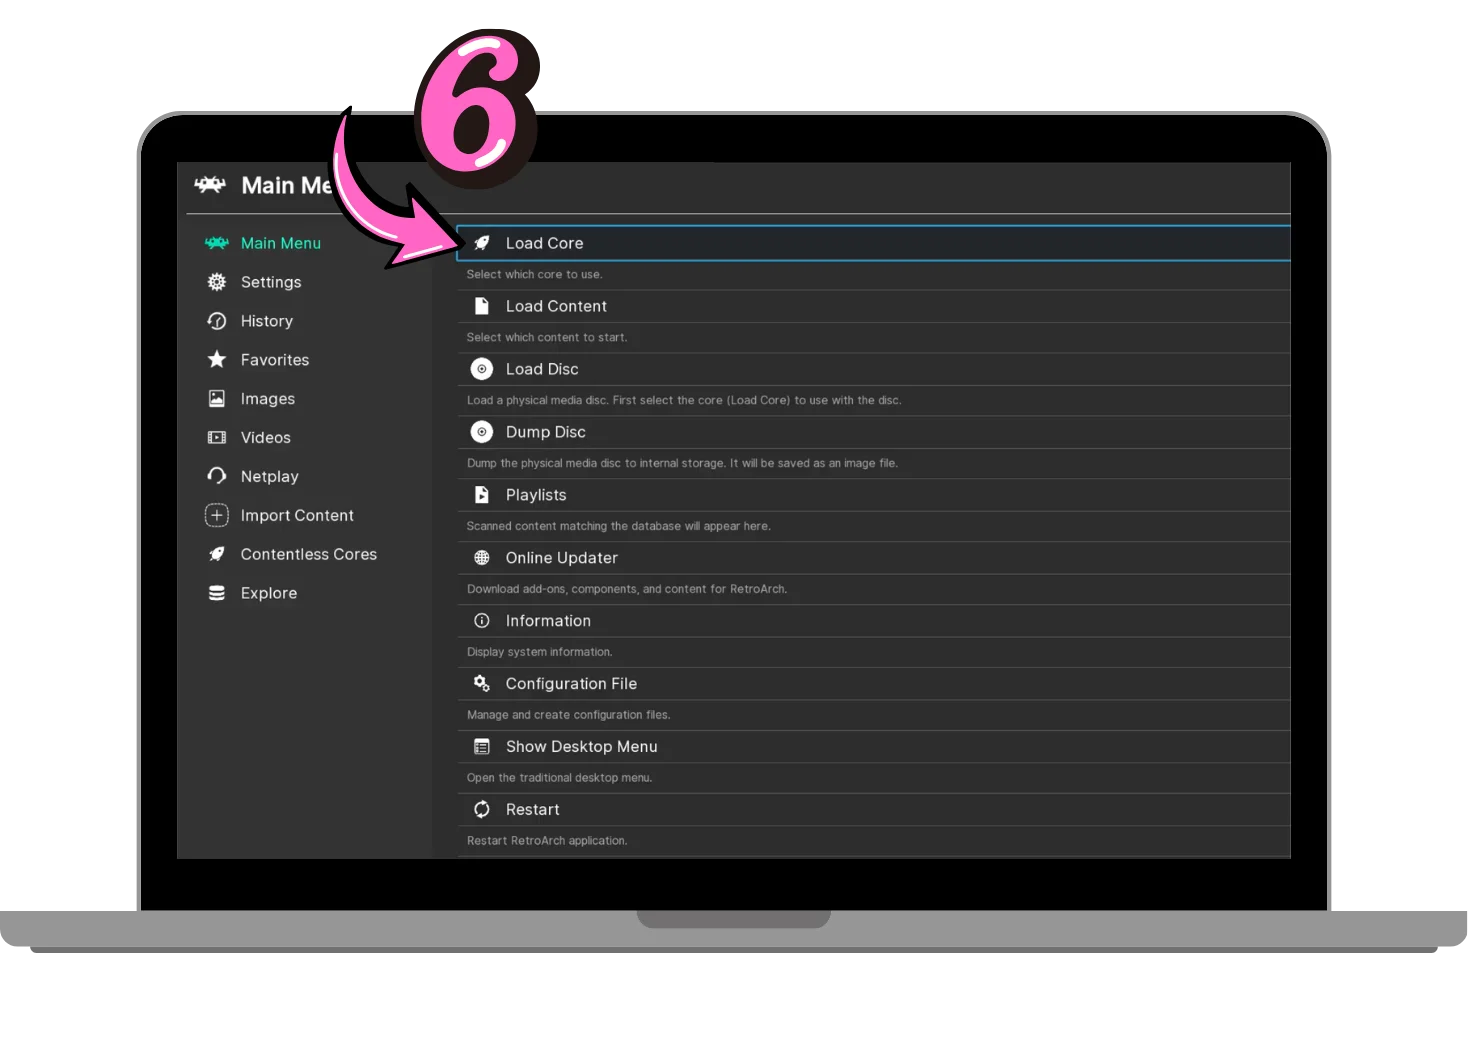
Where to Put PS1 BIOS in RetroArch (Folder Locations)
The exact folder depends on your system. Below are the default paths:
The path can change with the install type. So always confirm it in Settings > Directory > System/BIOS. After that, place the file there and keep the original name. Then RetroArch should detect it on its own.
PS1 BIOS on Handheld and Retro Devices
Many people now play PS1 games on handhelds and retro consoles. These devices use systems like RetroPie, Batocera, Recalbox, Knulli, and EmuDeck. So the BIOS setup is a little different, but the idea is the same. You drop the BIOS file into a bios folder, and the system finds it.
Two rules matter most here. First, the file names must be lowercase and exact, because these systems are case-sensitive. Second, many of them work best with the region-free psxonpsp660.bin. So that one file can cover most of your games.
Below are the default BIOS folders for popular devices:
| Device / system | BIOS folder location |
|---|---|
| RetroPie (Raspberry Pi) | /home/pi/RetroPie/BIOS/ |
| Batocera | /userdata/bios/ (or the bios network share) |
| Recalbox | /recalbox/share/bios/ |
| Knulli / muOS / ROCKNIX (Anbernic) | the bios folder on the SD card |
| Steam Deck (EmuDeck) | Emulation/bios |
After you copy the file, reboot the device. Then open the BIOS check menu, if your system has one. There, you can confirm that the PS1 BIOS shows as valid. So you know it is ready before you load a game.
PS1 BIOS vs. HLE (High-Level Emulation)
HLE means High-Level Emulation. It copies BIOS actions with code, so it needs no real file. This works on many setups. However, it can miss small details from the real console.
A real BIOS file is more accurate. It runs more games, shows the boot screen, and handles saves well. So for long sessions, a real PS1 BIOS is the safer choice.
Common PS1 BIOS Errors and Fixes
Even with the right file, small problems can show up. Below are the most common ones and quick fixes.
PSX Emu BIOS: Terminology Made Simple
The term “PSX Emu BIOS” can be confusing. PSX is a common nickname for the original PlayStation. So today, “PSX BIOS” and “PS1 BIOS” mean the same thing. In short, files like scph1001.bin cover both names.
Checklist for Stable PS1 Emulation
Before a long session, run this quick check.
Once these basics are set, emulation feels reliable. Games boot on time, saves stay safe, and cutscenes play smoothly.
Conclusion
The PS1 BIOS unlocks the full PlayStation 1 experience on modern devices. With the right file, your games boot cleanly, saves stay safe, and the classic logo greets you every time. In our testing, SCPH1001.bin handled almost every US game without trouble, so it is the file we reach for first. So download a clean BIOS, verify its MD5, match it to your game region, and follow the steps above. After that, you are ready to enjoy your favorite PS1 titles on PC, Android, or iOS.